Solved! Dreaded Error 10 - cable has short in it, normal? Polaris 9550

Hi - I read as many posts as I could find, youtube videos, etc. - help please.
I found my black and grey/brown wires have continuity before and after the swivel.
I have tried sanding the pins that plug into the controller - they look alright.
Robot runs for a few minutes before the error - with and without the basket (so scratch off algae in the basket).
i've cleaned the impeller.
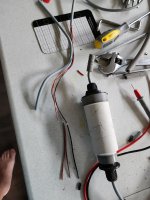
when i STARTED to open the motor block i heard air hissing - so i immediately tightened back up - that tells me (i hope) that it was air and water tight in there - no need to mess that up!
what made the most sense to me, is like the video's i've seen, where the wires insulation have cracked inside the sleeve by the bend where they enter the robot - that would make sense to me why sometimes it would run, and then stop - if there was a bad connection at the cord end by the controller, i'd imagine it wouldn't run at all.
so, i'm at the point now where i'm ready to take apart the swivel. i doubt the short is in there.
i also frankly don't know (but don't believe) there should be continuity between 2 of the 3 wires.
i don't like the idea of soldering (i've got multiple irons) but more importantly, water proofing.
i did order molex pins, if i have to i'd cut the wire by the robot and repin - i think that would be more water tight than a patch job.
I welcome any thoughts, suggestions or advice! Thank you!
 
Can you tell us what make, model cleaner you have? That in the Thread Title might get someones attention whom has one.
 
Did you take apart the plug end that goes into the controller? It unscrews. That is where the failure usually occurs. The cables are only held in with an allen-head set-screw and those screws loosens up.

 
  • Like
Reactions: mknauss
Did you take apart the plug end that goes into the controller? It unscrews. That is where the failure usually occurs. The cables are only held in with an allen-head set-screw and those screws loosens up.

Hi - thanks for the reply. i was able to unscrew the pin holder on the controller side, and also remove from the motor box on the robot side, that's how i was able to check continuity. however, i wasn't expecting a short between 2 out of the 3 wires - i figure one is hot, one is ground, and one is signal, and they should not be shorting.
I've watched every video I could find - in fact, I couldn't unscrew using a needlenose plier, and ended up gently unscrewing while i had it connected to the controller - THAT worked!
I plan to take the swivel apart (which i'm dreading) and see if the short is before or after it - or if removing the swivel solves the short. otherwise, my guess is it's cracks in the insulation where it enters the robot.
Any chance you can check yours to see if the black and brown/grey do show a short? if so, that might not be my issue...

Mine works fine (8th season) but I have had to rebuild that connector 2 times. I did the same I unscrewed it while it was connected to the controller. Make sure you take all 3 wires out, cut them to clean up the ends and reconnect them. Might even be good to tin them with solder. If mine stops again that is what I will do. When I did take mine completely apart the ends that are screwed into the connecter were totally broken off. So just because it looks ok doesn't mean it is.
 
Mine works fine (8th season) but I have had to rebuild that connector 2 times. I did the same I unscrewed it while it was connected to the controller. Make sure you take all 3 wires out, cut them to clean up the ends and reconnect them. Might even be good to tin them with solder.

Thanks, that works be the easiest repair, but since it at least looks okay, and no stay wires, I don't think that's my issue.
Can you please check if you 2 pins are showing continuity?
Many thanks!
 
It usually breaks at the elbow but if you say a short that happens when the cable kinks badly and doesn't get corrected and the twisting of the cable breaks the inside insulation and short. Found that exact scenario in one of the ones I worked on. It's usually too far up the cable and thereby shortens it too much to be further used. Here is some pictures from my handy work for entertainment. The pins are the original ones and I've never put in new ones and have done it quite a few times. There's not much room as the complete repair needs to fit back into the water tight connector so you're working really close. Don't forget to put the back portion of the connector on the cable before you repair.
Screenshot_20240624_195751.jpgScreenshot_20240624_195842.jpgScreenshot_20240624_195910.jpgScreenshot_20240624_195937.jpgScreenshot_20240624_200001.jpgScreenshot_20240624_200026.jpgScreenshot_20240624_200055.jpgScreenshot_20240624_200120.jpg
 

Enjoying this content?

Support TFP with a donation.

Give Support
Many thanks @wireform. I think my plan of attack tonight after work, is to use my 3rd hand to hold the probe wires and bend the cable (after i remove the last bit from the chasis) and bend until the continuity stops (if i can) - then i know where the break is - and then decide how to cut it, etc. - i'd love to splice, but i'm afraid i won't get it watertight. i'm also awaiting my molex delivery.
I DID damage the exterior of the swivel a bit (it looked perfect inside, though i couldn't see behind the copper traces - the wire was too short) but everything in there looked great. i'm hoping i didn't really f it up by how it damaged the exterior (where i was supposed to put the needle nose and twist - i coudln't - and my wrench ended up breaking off pieces of the lip). may not be a major issue.
i presume there is NO short under normal operation?
thanks again!
 
@wireform - i just spent a few minutes going back over your photos and I realize what you did - BRILLIANT! so much better than manhandling the molex connectors and re-crimping. My biggest question - how did you get the molex out - did you use that tiny looking screwdriver to press above or below the socket?
thanks so much - i'm feeling more confident about this!
THIS
 
Wow, awesome kit for only 10 clams! I’ve seen single Molex removers for $20. I didn’t see your reply until now, I ultimately used a ferrule to do the job, and I ultimately cut out the swivel as well. Everything back together, I had unnecessarily removed one wheel ( couldn’t remove the other) and reassembled the front leaving out a bushing, so tomorrow I’ll try again to remove the wheel (any tips appreciated) and then it can go swimming - continuity and no more short, using your soldering the existing molex pins technique! Thank you again!
 
  • Like
Reactions: wireform
I use 2 of These or similar to put slight pressure between the back of the wheel and the plastic casing sort of 180° apart so as soon as the release on the bushing gets depressed through the release hole, the wheel backs off just enough so then my hands can do the rest.
 
I use 2 of These or similar to put slight pressure between the back of the wheel and the plastic casing sort of 180° apart so as soon as the release on the bushing gets depressed through the release hole, the wheel backs off just enough so then my hands can do the rest.
thanks again, you have the best toys! i spent no kidding, over 45 minutes last night - i was able to get one wheel off some how, some way - and later realized i didn't need to - and when i reassembled, i had a spare part (a bushing) which is a very bad thing - this a.m. i had the great idea after watching more videos - so i had my wife pull on the wheel as i depressed a screwdriver in that hole, every which way and angle i could - after 5 minutes we had to quit. super frustrating. i need to replace the bushing to the spinning brush, then i can try the restored beast - no shorts on the cable, so after replacing that bushing i expect (with fingers crossed) perfect performance - but can't believe how troublesome that wheel is!
I did just find a 13 or so year old post for the 9300xi (which i used to have) which talked about disassembling the shell (again) and then using a mallet - that will be my last resort.
thank you again!
 
Solved! And lessons learned!
1. simple test of continuity of the brown and black pins showed me a short - which should NOT exist
2. disconnecting wire from motor block still had short - that didn't eliminate motor block as a potential issue, but showed there was still a short
3. unscrewing motor block screws, i heard a hiss - so i stopped - that told me motor block should NOT have water in it (but yours might!)
4. I disconnected the swivel, and short existed on one side of it....the robot side
5. I removed a wheel (unnecessarily) and then after i removed a scrubber (unnecessarily) I forgot to put back a bushing, cost me HOURS! (ultimately after fully assembled, i had to fully disassemble to be able to remove the wheel a second time - using a mallet!)
6. Wireform's tip/trick of tinning and re-using the existing 3 molex connectors was brilliant! (my new molex connectors still didn't come, but that's okay, my robot is happily working in the pool, no swivel, no error code 10)
7. I later this morning remove the wiring from the jacket, and sure enough there were not only breaks in the 3 wires IN THE SAME SPOT but corrosion, and the red wire snapped as I was pulling the jacket off.
Hope this helps someone!
 

Attachments

  • 2024-06-27 06.23.58.jpg
    2024-06-27 06.23.58.jpg
    337.7 KB · Views: 14
  • 2024-06-27 06.24.34.jpg
    2024-06-27 06.24.34.jpg
    435 KB · Views: 14
I had that scenario several times when the cable twists alot it causes the individual conductors to stretch which they cannot therefore the insulation on the individual wires break and short out to each other.
 
I had that scenario several times when the cable twists alot it causes the individual conductors to stretch which they cannot therefore the insulation on the individual wires break and short out to each other.
thanks - i was scratching my head - the double grey layers of insulation looked fine to me, so i couldn't figure out how water got in there to corrode - so now you have me thinking the white stuff is from the wires rubbing or sparking perhaps? even with only 30 volts?
 
Thread Status
Hello , This thread has been inactive for over 60 days. New postings here are unlikely to be seen or responded to by other members. For better visibility, consider Starting A New Thread.