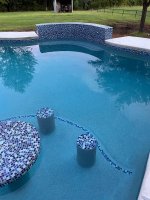
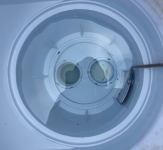
I wanted to place a generic post that people can refer to when closing an IG Pool with a sand filter.
The information in this thread is based on my experience, how I prefer to close a pool, and extremely valuable information from some of the many talented forum members. Most of the credit should be given to them as you will see that the links are very detailed. There is no right and wrong way to close a pool, but many choices. It is entirely up to you to determine what will work for you. What works for one forum member does not necessarily work for another. Although, the concept is similar. Please feel free to ask questions.
DISCLAIMER:
Please be aware that not closing a pool properly could lead to internal damage to piping, skimmer housing, shut-off valves, filters, pumps, chlorinator, salt cell, etc. If you are not comfortable closing your own pool, it is best to hire a professional and obtain a written guarantee. Please note that a volume of air is needed to clear the lines, not pressure. Do not over-pressurize your air compressor and shut it down immediately to avoid back pressure at the end. Always have someone assist you with the closing to make it easier.
CLOSING PROCEDURES FOR AN IN-GROUND POOL
Please note that this is done from the equipment pad. It is up to you to determine where you will start. Some people work from the skimmer(s), then to the equipment pad, back to the drains, and the returns. The concept is similar across the board.
The shop vac and air compressor have to have enough air volume to move water through the main drain. An 8' deep main drain requires enough volume to clear out 96 inches of sealed pressure. Please look at Post # 5 (JamesW) as the 10-gallon industrial shop vac can clear up to 105 inches. If you are attempting to use your Shop Vac, remove the filter and isolate all the lines so you are only working with the main drain.
Your shop vac,
may not be successful, because it is not designed to generate enough pressure (not a lot needed), and the air volume required to lift water in the main drain above the frost line and create the "air lock". (Please see post # 7 from James W).
If you were successful in clearing the main drain with a shop vac, please describe exactly what you did, how deep your main drain is, and what shop vac you used. Please be specific.
HELP can't blow out the main drain
When I refer to the Cyclone (Professional Pool Blower), I am speaking about the unit you will be using to clear out the lines. The Cyclone will clear up to 160 inches or up to 13-foot depth.
The skimmers are closed with Gizzmo's or black expandable rubber plugs, and return jets are closed off with black expandable rubber plugs. The main drain is closed off by creating an “air lock” with the shut-off valve. If you have a spillover spa that pulls water and returns water, then you will have the same concept with the valve. Air travels to the heater and back. Unless there is a drain plug, then your heater will be winterized during the process. Most PB charge extra for a waterfall and heater!
EDIT: on 09/25/2023 - Even after years of closing a pool, sometimes you run into a snag. I lost 45 minutes today with the Gizzmo's leaking. After 3 attempts, I took out the winter plugs. Even with the Teflon tape and gasket, still a leak. Therefore, I used # 12 black plugs, but interestingly enough I needed a little helper to shut off the Cyclone because of the power for about 5 seconds on the second return. After this, I angled the Green Gizzmo's inside together and added some foam for expansion. I feel that moving forward this is what I will do given the amount of time I lost, plug I was completely soaked.
If the pool has a
Paramount cleaning system, then this is a bit more tricky. Please see the thread below for the correct procedures. You can blow air through each port until the floor return lifts and bubbles like the main drain and then quickly plug each area. Or you can purchase the blow-out plugs (see all the way below - pictures and description) the plugs with the Schrader valves and use an air compressor. The air will be automatically locked for each one. The difference is about $5 per plug and you will also need an air compressor. A big thanks to
PoolGuyCT for his product knowledge of these types of systems.
Safety cover and water levels
Pools are different, so there will be variations to my closing procedures. I wanted to put something together that is uniform with all posts. Depending on your filter, the closing procedure will also be different.
This post is for a sand filter with a multiport valve, a heater, and your basic main drain, skimmers, and returns.
I do not use any antifreeze in the plumbing lines. My feelings are that if water is removed properly, and there is no water left in the lines, there is no need. This is all based on comfort. It is entirely up to you if you wish to purchase antifreeze. I do not use any foam or rope in any piping. If you are in a real cold region of the country, then antifreeze may be in your best interest.
5-7 days prior to closing the pool, I bring the pool up to near SLAM level based on my CYA and allow the levels to drift down. The pump will run a full 24-hour cycle for only the first day. After this, the pump will run for around 4 hours until the last day. No more chlorine additions are needed.
Approximately 24 hours prior to closing, I add the Kemtek Poly-Quat 60 Non-foaming, non-metallic algaecide and
allow the pump to run for 12-24 hours.
Your levels at closing are either at the highest or at normal, not in between. If you are using Poly-Quat, then you must allow your levels to come back down to normal. If you are not using the algaecide, then keep at SLAM right before you close. If you are using Poly-Quat, allow your levels to drift down to your normal CYA/FC levels. If you are not using the algaecide, you can close with the SLAM - higher levels. There is an interaction between high chlorine levels and the algaecide that does not work. Even the instructions state to keep your FC at a certain level. Post # 2, quote from (Chem Geek)
"Polyquat does not oxidize chlorine; it is the other way around where chlorine oxidizes Polyquat, or Polyquat gets oxidized by chlorine."
Please see the post below.
Polyquat algaecides: Mode of Action
On the day of the closing, I will swap out the salt cell for a dummy pipe. In addition, I backwash the filter, rinse, and then place MPV (Multi-Port Valve) on recirculate. After this, I pump water off the steps in the shallow end until I am about 1” below the skimmers. I do not go below the returns. You can also clear the lines on the "filter" setting. While the water is being pumped out of the pool, all the outside furniture is stored in the basement and the aqua blocks (water bags) are set up around the perimeter of the pool. If you have a safety cover, this is a good time to also lay it out and get it ready for the pool. Use your time constructively and when finished you will feel great, not only that you saved hundreds of dollars, but that this process was done without rushing everything.
I shut off the power switch for the pump at the equipment pad. If you have pins in your timer, remove them as well.
Ladder and Handrail Removal (A Word of Caution)
Each year, when I install the ladders, with the bolt and anchor, I count how many turns (clockwise) are needed for each bolt so there is a secure fit. When I remove the ladders and handrail, with the same amount of turns (counterclockwise), I turn the bolts, bang them down carefully wiggle the ladder and handrail, and remove. To make life easier, approximately every month, I remove the ladder and handrail as part of routine maintenance. Clean out the cups and rinse with fresh water. If you are having trouble, try some hot water to loosen things up. If you loosen the bolts too much or tighten them too much, then you may have a problem removing them. If you lose the anchor, you may never get the ladder and handrail out. Keep track of the turns. Everyone should have a list for closing the pool, so as not to miss anything, and this should be jotted down.
This is the return side of the swimming pool.
First, I close off the suction side (Skimmer and Main drains). This can be done with the valve(s) or by a black plug in the pump basket. I swap out the pump lid, which has been modified. If you have unions, you can work from there. If not, you will have to work from the skimmer(s), or with an NPT fitting at the pump basket.
Modified Cover for Hayward Super Pump for Closing Swimming Pool.
Link to Cyclone. Never have taken pictures with Cyclone and Modified Cover, but you will see the shop vac, which is the same method.
cyclone pool blower - Google Search
I turn on the Cyclone and remove the air and the first return will start bubbling. With goggles, I lean on the concrete and plug the first return. You will find that as each return is plugged, the next return starts bubbling. I keep moving on to each return.
If you find that air is leaking from the return, this could be due to the fact that the plug may be really old, the plug is not flush, or if you have a liner pool, a small part of the liner is trapped between the housing and the threads causing a gap. You can carefully trim the inside of the liner with a small razor/putty knife.
Winter Return Closing Plugs
You may want to inspect the plugs before installation as well. Always keep extra winter plugs (new ones) with your winter closing storage bin. If you find that you have made several turns and it is becoming harder, and you still have air bubbles coming out, stop, back off the wing nut, and discard the plug. If the wing nut breaks, it will be very difficult to unscrew and you will have to use pliers to remove it very carefully. It is a very tedious time-consuming process. Your best bet is to discard the plug and use a new one. The plugs are very inexpensive online. I would keep at least 2 seasons' worth on hand to replace each return.
One thing I have found is that sometimes, because of the back pressure, the plugs will leak. This is due to the gap that is still from the outer to the inner area. If you also find that they leak (do not over-tighten either) as you may never get them off, remove one plug to release some of the pressure, and then you are good to go. Always, when I open the pool, I have air leaving the pipes, which shows that air has always been trapped inside. Do not be overly concerned about water entering the lines, as there will always be a small amount of water inside the pipes. The goal is to clear most of the water out of the lines.
Below are pictures of # 10 plugs and # 8 plugs. The # 10 plugs will stick out of the returns and at the threads and will create a seal. The # 8 plugs will be tucked deep inside the threaded housing of the SP1408 (Hayward return only) and will create a seal as well. They have extended # 8 plugs that can be used as well. Position flush while performing the closing, and then slowly hand tight until no more air bubbles are visible. The # 10 pictures show you (without the face plate), where the plug grabs the threads. The plug at the face plate is not that important, behind it is. The # 8 plugs are recessed and do not grab the threads, just the smooth part of the back (which you really cannot see).
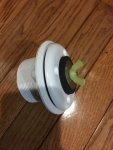
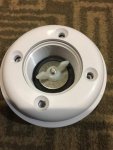
If you wait long enough, more than one return will start bubbling. When I reach the 7th or the 8th return, I instruct the operator (a second helper), who is near the Cyclone that when I raise my hand to shut off the Cyclone. This is done not to build too much back pressure. Once I plug the last return is when the Cyclone needs to be shut off. If you do not have a secondhand, run the extension cord for your blower right near the return so you can disconnect once the last plug holds. Even though still leaking a little air, come up, shut off the compressor, go back down, and finish tightening the last plug. Remember what I mentioned earlier about back pressure, release some of this and move on.
If you have a heater plumbed in, as you are clearing the lines, water is being removed from the heater as well. My heat pump has no drain plugs. Gas heaters, at least most of them have drain plugs. Entirely up to you if you wish to remove it for the winter as per the manufacturer's instructions. My experience with friends and people in the business, especially in NJ, is that they do not remove the drain plugs. Make sure the gas is shut off and the pressure valve can be removed or left on. All personal preferences.
Now, you will move on to the suction side.
Place the MPV on closed or place a black plug in the pump basket to close off and not allow air to travel towards the filter.
First, I shut off the main drain by closing the valve. Then I shut off the second skimmer. Now, I turn on the Cyclone. As the water is gushing out of the skimmer, I have a wet vac handy and suck the water out of the skimmer simultaneously.
Post # 24 in this thread has a link if you have a combination skimmer/main drain, possibly with a diverter valve. The link is for in-ground pool skimmer plumbing type of configurations.
http://blog.poolcenter.com/article.aspx?articleid=6327
Also, this thread will give more information on the skimmer/main drain/diverter valve, etc. # 16 and # 21 with Pictures.
still cloudy after 3 days - Page 2
Once most, if not all the water is removed and the Cyclone is still running, I go back and close off the one skimmer and start blowing air through the second skimmer. While this is happening, I go back to the first skimmer and place Teflon tape on the Gizzmo and carefully screw into the skimmer port not to strip any threads.
Now back to the second skimmer and with the wet vac, I suction most of the water in the skimmer basket. Quickly, I go back to the Cyclone and shut it off. Now, I install the second Gizzmo the same way.
Back to the equipment pad, I open the main drain and close the skimmer(s) with the shut-off valves. The Cyclone is turned back on and the main drain starts bubbling creating a whirlpool. I count down to 30 seconds and simultaneously close the valve to the main drain, creating an “air lock” and shut off the Cyclone. In the pump basket, I install another black plug on the suction side. Personally, I do not know if this will help if the valve leaks, but others have used this technique.
Here is a post about the main drain. A little more reading and some excellent comments from Mas985.
Blowing out the main drain? Friendly debate
Now, I remove the sight glass, the pressure gauge, the drain cap on the sand filter, and the drain plugs on the pump basket should be removed as well. Because there is an SWG installed, I remove the cell and install the dummy pipe for the winter. You can do this prior to clearing the lines or after as it does not matter. Then, I place the MPV between two settings. Personally, I do not remove any drain screws from the pump basket. Now, I put the regular pump lid and cover the heat pump. The water will continue to drain over the next few weeks at the sand filter way before any freezing temperatures set in.
Below is a link on winterizing your sand filter (Please go to post # 14):
winterizing with a sand filter
The last and final step is the cover. I have a tarp with water baskets. If you have a safety cover, this usually requires a second hand. Then I turn off the breakers for the heat pump, pool light, and pump at the fuse box.
If you are using something else than a Cyclone, below you will find some threads on what other members have done with a shop vac and/or a pancake compressor and some other pointers that I picked up from the forum.
This question comes up a lot. I feel that there are several factors that play into whether or not a compressor or shop vac will be efficient enough to accomplish the task of blowing out all the lines properly. It is not pressure that is needed, but more volume.
...The distance and size of your plumbing to each return, skimmer, and main drain are items to consider.
... Lowering water below the skimmer and returns make a huge difference in blowing out these areas. If water is lowered, one can literally vacuum most of the water out of the lines first and then blow the remaining water out.
... Having the appropriate shut-off valves in which one can isolate each section is important as well.
... Where you are blowing the air from and if the elevation of the area is higher or lower than return jets and skimmers.
Below, please find a thread (Post # 10) that describes the experience a member has had with a pancake compressor and how to work more efficiently!
Closing: blowing out lines, water level, and then some
Problem blowing out pool lines
Below is some additional information on the Cyclone that came from the manufacturer:
From speaking with the manufacturer, the Cyclone produces about 5 psi, and with the resistance of the water, the return jets are at about 90 cfm, and the main drain is about 30 cfm. Under no pressure, the unit produces 130 cfm. The bubbling effect of the main is really powerful.
I would assume that an air compressor that can produce 10 cfm may be sufficient to move the water below the frost line. There is also a difference of the hose involved. The 1.5" hose creates a lot more air than your standard air compressor hose.
Please take a look at post # 15 (problems blowing out pool lines), this describes the amount of CFM needed and for what. If one can isolate each area when closing, the task is accomplished a lot easier. This also assumes 2" plumbing, which creates less resistance. Some pools have 1"-1.5", which may require more cfm. The information is from another member of the forum, but I can not recall who wrote the post as it was copied.
Any questions, please write back.
EDIT: Please look at post # 9 in the Closing Pool Blow Out Connection Post/Thread. This is if you decide to purchase a Cyclone and hose only, and not create a modified cover, this is what you can do. The hose is flexible enough to be placed in the pump basket. Pictures attached. This is a 2 HP pump and I believe the 1.5 HP and 1 HP pumps have smaller piping, which is fine. The hose can be placed against the inside and not in the piping as in the picture. I had a difficult time finding any adapters in Lowes today. Monday, I will call the pool place where I ordered all the fittings to see if they have a 90-degree sweep adapter to fit on the hose. This will make the setup easier and if so, I will report back to this thread.
Closing Pool: Blow out connection Questions...
If you have closed your pool, and have a new thread specifically for this purpose, and used this thread as guidance, I would like to place your link below. For example, how you were successful with a shop vac. What worked and what did not work. Did you use a compressor? If so, which kind, etc. What you would do differently next time, etc. Please send me the link (PM), and I will add it to this thread (first post). Some people will not continue to read afterward, so it is best to keep this single post. Pictures are really helpful. Thanks!
Some pictures below on where the air compressor, shop vacuum, or Cyclone can be hooked up. Please read the description after the pictures:
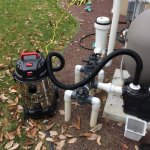
The picture above and the picture below show a small shop vac. The test here was to determine if this was powerful enough to clear out skimmer lines, main drains, returns, etc., which it was not. The shop vac may be successful if one builds some pressure and burps the system with a winter plug. The Cyclone is used, instead of the shop vac, but you will be able to see how it is hooked up with the modified cover. The shop vac was successful in removing some more water out of the filter through the drain plug only.
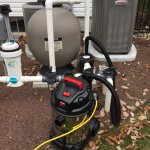
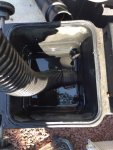
The pictures above and below show that the 1.5" hose is flexible enough to be placed in the pump basket, even without a modified cover. One could wrap a microfiber towel in the port opening to help with air coming back into the basket. If done with a professional pool blower, you will also be successful in clearing the lines as I have seen others work this way.
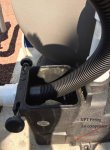
The picture above shows the screw that is to be removed and you could attach an NPT fitting that hooks up to your compressor. With this scenario, The pump basket should be removed and the cover placed on. No modified cover is needed. Air will build up inside the pump basket and move to the first area with the least resistance. I would recommend highly that you isolate each area or clear one line at a time, and even possibly burp the lines. With the main drain, you may need to air lock the system many times as you can not plug the bottom and burp the line. Start with low pressure (15 psi to 20 psi) and work your way up to no more than 30 psi. Remember that air volume is needed here, not pressure.
An NPT fitting attaches to your air compressor hose and is threaded to the pump housing basket.
Please note that the FROG System has been cut out. A SWG, heat pump, and chlorinator were all added, but the pump housing/motor/filter, etc. has not changed.
Below are pictures of the Winter Plugs (# 9, # 10, & # 11), with Blow Out Schrader Valves and Winter Plug Chart to match up to plumbing size.
Blow-Thru Valve Winter Pool Plugs - Various Sizes
Thread below on Blow-Thru Valve Winter Pool Plugs
Blow-Thru Valve Winter Pool Plugs
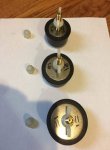
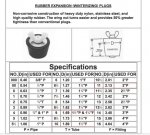 Below, you will find a schematic of air travel.
.. From the pump, air will travel towards the suction side.
.. From the pump, air will travel to the returns through the filter, heater, SWG, and back to the pool.
.. Please note that not all pools will have a main drain (MD), 2 skimmers, and 6 returns.
.. Any waterfall feature will also be cleared out on the return side (not shown)
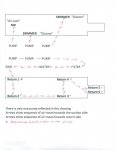 SUCCESSFUL LINKS CLOSING POSTS BELOW:
The thread below is very detailed and includes pictures.
Thinking about closing my own pool but have some concerns
