Our 1st pool! Backyard transformation and upcoming Intex 9x18 AGP install.

DigitalGuru

Member
Feb 20, 2024
23
SE Michigan
Pool Size
4545
Surface
Vinyl
Chlorine
Salt Water Generator
SWG Type
Intex Krystal Clear
Cross post from my introduction post:
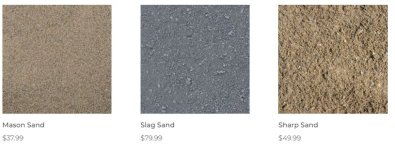
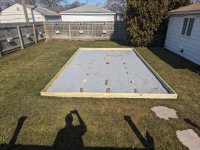
"Good morning all. Wife and I bought a 9x18 Intex AGP last fall during the "end of season" sale on Amazon, along with a saltwater system, skimmer, solar cover & roller. We live in SE Michigan in a cookie cutter 1950's ranch on a small lot. We previously had a couple raised bed gardens and couple of non-fruiting fruit trees in our backyard. Last fall in preparation for this pool I killed all the grass, cut down the trees and pulled the stumps, tilled the entire yard to 8" deep, used a ditch witch to re-grade our entire yard and create a "flat" 13'x22' area covered in landscape fabric for the pool. I used a plate compactor on the pool 13x22 area but didn't get crazy on the fine tuning of the flat / levelness as I knew that tilling and frost heaving could change over the winter. Now I'm getting the supplies ready to put in a flat and level 2x6"PT edge around the pool base area and plan on filling in with mason sand and pack it down to make the final flat grade. Can't wait for spring!"

I wanted to have a thread to share our progress / receive feedback, so apologies for the cross post if that's not acceptable here. It's my first day here!

A bit more backstory; I've spent a lot of my early life in and around pools. Neighborhood community pool as a young kid, then competitive swimming during middle and high school. My wife spent a lot of time at her friends place with a pool as a kid and last August, mentioned that she always wanted a pool. This was my chance! We were in a bit of a transition on our backyard as we did have a raised bed garden that had started to burst its frame and we left to go wild for a year or so. Earlier in 2023, I did the "No Mow May", and with the wild garden absolutely took over my backyard with thistle and other weeds. It was dangerous to walk in our backyard from all the then-mowed weeds that left surprisingly stiff and sharp stalks. This was my first thought that we might need to go the nuclear option and kill all the grass and weeds and regrade the backyard as the garden walls totally blew out and we had 10" hill of dirt in the middle of our yard. We had also years before tried to plant some of these "fruit cocktail" dwarf trees that are supposed to grow 4-6 different fruit types one the same tree; apple, pear, and stone fruit. These trees never took off like they should have and never fruited, but did grow to about 12-16' tall. Unfortunately, I had mis-dug the holes for these and they were about 6-8" below grade. So between the garden hill and sunken trunks, +70 years of backyard existence, our yard had significant grading issues.

We discussed getting an above ground pool and took the measurements to make sure that we can legally have one in our small yard with the proper powerline setbacks and we could! We looked at the Intex 9'x18'x52" for around $1150 at the time on Amazon and we decided to watch it to see if the price came down as the season wound down. It did a few weeks later and were were able to get it for $880 with tax and free next day delivery. We decided to plan for a spring '24 installation and I got to work killing our grass and cutting the trees down. I rented a large tiller, ditch witch and plate compactor for a long weekend and was able to rip out the stumps, till, and regrade our entire backyard with a 13'x22' flat(ish) area for the pool. I covered the "pool pad" with landscape fabric a planted a sun/shade grass mix. The grass seed took pretty well and we had a stable lawn before the end of growing season.

We recently started to dress up our backyard with fence planters and new LED solar lights to illuminate these planters when we get them filled with flowers. I just bought 2"x6" pressure treated boards and a rotary laser kit to create a flat / level border a couple inches higher than the highpoint of our pad. I then want to fill this border with mason sand, screed and repack it to make the final flat pool base. When we are ready to install the pool, remove the sand for the 12"x12"x2" foot pads for the pool legs so they are flush with the pool base.

Any tips or suggestions are always appreciated! Link to my progress photo album.

01-May2023.jpg02-DeadGrass.jpg03-Tools.jpg04-Tilled.jpg05-Graded.jpg06-FenceUpdate.jpg07-Feb2024.jpg
 
Last edited by a moderator:
When I built my intex, I used sections of pressure treated 2x6, and last year I installed massive patio stones, 4-6" thick, 18-26" long. The biggest thing that I learned for my first time setup, was only the legs needed to be level. Anything else can be out of whack. Sand and what not is only for feels. Mine was installed on dirt with the big rocks removed, and since I don't walk around in the pool all day, I use it for swimming and lounging, I've need required the need for a pad or foam boards. I have 2 tarps to try and help keep the weeds down as per the manual but in reality, nothing grows when that much weight is there.

Build is linked in my signature.
 
@koffey Thank you for your input and link to your build thread. I just read the whole thing!

Question for all: once I get the pool filled from our hose for the first time and get the pump/filter and saltwater generator connected, do I need to add liquid chlorine and get the measurements stable before adding the salt and turning on the chlorine generator?
 
Yes. Think of the SWG as cruise control in your car. It does awesome maintaining 65 MPH but sucks at merging onto the highway from a stop. Mash the gas with liquid chlorine to get up to speed then turn the SWG on.

Also you want the salt to mix for at least 24 hours with no power to the SWG. It can ruin the unit if it sucks extra salty water when it's on.
 
  • Like
Reactions: DigitalGuru
@koffey Thank you for your input and link to your build thread. I just read the whole thing!

Question for all: once I get the pool filled from our hose for the first time and get the pump/filter and saltwater generator connected, do I need to add liquid chlorine and get the measurements stable before adding the salt and turning on the chlorine generator?
Don't forget to get yourself a proper test kit with salt testing. Since you're in Michigan, I'm going to assume that you plan on taking the pool down every season? I do. Last season when I installed the patio stones, much to my dismay, the frost heave shifted them enough that my pool was 1" higher on one side and I didn't notice it until after I filled, but 1" is ok. Come May, I'll have to adjust the stones, aka remove/reinstall, to level it out. Make yourself a water level.

I love your pool, that was the one I was trying to buy, but no where in Canada could I purchase it. Intex would sell it to me but it was going to cost about $4000 CAD because it had to be shipped by freight and from California. Sheesh. Ended up with a $1100 one from Costco during the pandemic, only sold online and they sold out fast. I got #87 of 89. People were selling them on the classifieds for $2500 lol, crazy times.
 
remove the sand for the 12"x12"x2" foot pads for the pool legs so they are flush with the pool base.
Just saw this upon re-reading. You want 4 inch thick pavers. The 2 inch thick ones are really stepping stones at 1.5 inch actual thickness. They tend to crack and if/when enough do, you're taking down the whole pool to start over.
 
Don't forget to get yourself a proper test kit with salt testing. Since you're in Michigan, I'm going to assume that you plan on taking the pool down every season? I do. Last season when I installed the patio stones, much to my dismay, the frost heave shifted them enough that my pool was 1" higher on one side and I didn't notice it until after I filled, but 1" is ok. Come May, I'll have to adjust the stones, aka remove/reinstall, to level it out. Make yourself a water level.
I do plan on getting a salt water tester of some sort. I do have an expensive Hanna pH/EC/ppm meter, but it doesn't do salt specifically. I did plan on getting the Clorox test strips and app as I've already bought their chemicals. Would the Hanna meter +strips be good enough, plus a salt test?
I do plan on taking the pool down every year, likely storing the filter, pump, and SWG indoors while leaving the liner and legs either in our garage or a small shed. Would it degrade to much if I put the liner and covers on a couple pallets and covered them with a tarp behind my garage out of direct sun?

@kimkats Thanks! I look forward to sharing and getting tips and advice.

I'd be more hesitant about leaving the liner outside due to mice, not so much the sun. I had a smaller pool and kept it in a small tin shed and the mice ate into it for nesting. Upsetting. I bought a keter 230 gallon deck box (circled, the other one is my wife's outdoor gym equipment) that I can store the liner, posts (supports) and all the equipment.

Capture.JPG

Test strips are not very accurate and neither are electronic devices. Since you invested in a beautiful pool, you should invest in a proper test kit. Once you get that pool filled with water and start running into some water chemistry issues, water turning green for example, the minute you post a thread asking for advice; people are going to ask you for you waters chemistry numbers and you won't have it. See the link below. If you just purchased the hanna meter, I'd suggest returning it. Also, what types of clorox chemicals did you buy?

TF-100 Salt Test Kit
 
Just saw this upon re-reading. You want 4 inch thick pavers. The 2 inch thick ones are really stepping stones at 1.5 inch actual thickness. They tend to crack and if/when enough do, you're taking down the whole pool to start over.
@Newdude- Wow, 4" stone pavers? This is from the Intex owners manual: "...a piece of pressure-treated wood, 15” x 15” x 1.2”, under each leg and set flush with the ground. The U-shaped side supports must be placed in the center of the pressure-treated wood and with the wood grain perpendicular to the support leg. NOTE: Make sure each support pad is recessed and set flush with the ground and not just placed on the ground."
Not sure where they are able to source 15" wide lumber. The 2x12 I bought is actually 1.6" thick so in reality is 1.6"x11.6"x12". I'd think if I doubled these up with the bottom one rotated 90" so the grain is perpendicular to the top one that would have the leg on it (with the grain perpendicular to the leg brace), that should be good. I've already cut up the 2x12, so I can't return it.

@koffey Good idea on the deck box. I plan on getting on for the pump/filter & SWG, and hoped I could seal the holes from the hoses and us it to store the liner over the winter. Pretty sure the one I was looking at has a floor. As for the meter, I already owned it and it is accurate to 1/100 of a pH level. Liquid testers are more accurate than that? I'll look into the set you linked. I've attached a picture of the Clorox chemicals I've bought so far. I forgot to include Clorox Pool&Spa 69001CLX Shock for Small Pools to the picture.
 

Attachments

  • CloroxChemical.JPG
    CloroxChemical.JPG
    65.6 KB · Views: 5
Last edited:

Enjoying this content?

Support TFP with a donation.

Give Support
The 2x12 I bought is actually 1.6" thick so in reality is 1.6"x11.6"x12". I'd think if I doubled these up with the bottom one rotated 90" so the grain is perpendicular to the top one that would have the leg on it (with the grain perpendicular to the leg brace),
Ok AWESOME !!! It'll be 3.5+ inches in the end on par with pavers. Not everybody's 2 inch (1.5 actual) stones/planks crack, but far too many do and there's no easy fix after the fact.

It costs peanuts to protect all your hard work.
 
  • Like
Reactions: DigitalGuru
I just finished making the 2x6 exterior frame / border. I plan on burying it about 3.5" in the ground as level as I can get it so I have about 2" above the grade. The fill with sand and be able to screed off this frame. I may go with slag sand as I like the grey color, and seems to pack better than the mason sand. It seems that in terms of packability; mason < sharp sand < slag sand, but obv gets more expensive. My Vevor rotary laser should be here today to help in leveling as well.
 

Attachments

  • Base sand.JPG
    Base sand.JPG
    53 KB · Views: 16
  • PXL_20240223_164938402.RAW-01.COVER.jpg
    PXL_20240223_164938402.RAW-01.COVER.jpg
    935.3 KB · Views: 16
  • Like
Reactions: kimkats
Finally made some progress after cold weather and other life responsibilities. Got 4 yards of mason sand delivered on Friday and was able to rent a mini track loader and plate compactor. Was able to quickly move the 4yds into the frame Friday night and got it roughly spread. Saturday morning I finished spreading and leveling the sand and after making one pass with the compactor, I could tell we didn't have enough sand. Decided to use the loader's trailer to go get another yard and was surprised to find them closed on a Saturday. Found another store, got it home, spread, packed and returned the equipment by 3pm! The tracks tore up my lawn, but that's fixable.PXL_20240406_003818882.RAW-01.COVER.jpgPXL_20240406_203407379.RAW-01.COVER.jpg
 
  • Like
Reactions: Sybrash
Attached is a picture of the support pads I made. Needed 12 pads for 9x18 so I bought a 2"x12"x12' and 3/4"plywood both pressure treated and glued and screwed together with 1.25" screws to not extend to far into the solid 2"x12". I bought and cut them a few months ago and have been drying them since. I made sure to orient the grains to have the 2x12 and top plywood perpendicular to the support leg. The actual size is 12x12x2.25", and I like the combination of plywood and lumber to minimize splitting.PXL_20240407_175012503.RAW-01.COVER.jpg
 
  • Like
Reactions: Newdude
Planning on setting up the pool this weekend! No forecasted temps below 38 for the next 10 days, fingers crossed we don't have any threat of freezing going forward. I hope to use this time to work on balancing the chemicals before the threat of algae is a problem. I am second guessing my pads a bit as the legs might overhang the edges a bit as some of these blocks have shrunk and now are about 11.5" wide. I was thinking of adding another layer of plywood on top that is a true 12x15. Then the question is do I center just the one new board over my existing, or offset it and add another 1.5" piece of PT. Not sure if I have enough plywood to make 2 layers, the same height as the rest of the pad.
Does the weight of the legs seem to sit more in the middle of the leg or on it corners?

17130127490733749314855911094729.jpg
 
Last edited by a moderator:
No forecasted temps below 38 for the next 10 days, fingers crossed we don't have any threat of freezing going forward.
I just looked it up for a fellow Michiganite and you're golden. My water warmed up to 55 degrees in 2 days once the cover was pulled. It can be 30 degrees for a few hours here and there and it's a joke. The deep freezes are over.
 
  • Like
Reactions: DigitalGuru
The entire leg will have lots of pressure.
As you fill the pool the legs will move (kick out then go back in some) that is why the boards should be long. Their tops should be flush with the ground that the pool sits on.
Your swcg will not be operational until the water is in the high 50’s/low 60’s so you will need to manually chlorinate until then.
Follow the chlorine part of the chart only raising cya to 30/40 at that time. Use
PoolMath to calculate amounts.
FC/CYA Levels.
Once you’re ready to use the swcg you can do an
Overnight Chlorine Loss Test to make sure you’re algae free & then raise cya to 60/70.
Use the sock method for cya.
 
Good to know on the legs moving. I plan on cutting the plywood to as big as I can get from my 61x48 sheet. Should end up with about a 16x15 and I'll center it above the 12x12 pad, glue and screw it. That'll be only about a 1.5-2" overhang. If it looks like Crud at the end of season, I'll replace it for next year.
 
Many get surprised by the movement when filling. Especially those who have “boxed in” the area where the pool will go based on the final dimensions in the instructions or placed it against a wall or something like that.
 

Enjoying this content?

Support TFP with a donation.

Give Support