Hello everyone and welcome to my redneck HotTub build thread. 
Background:
My family owns a rustic cabin up at a mountain lake in the woods. Being that it's a mountain lake in Canada it's often quite cold up there! I want to build a hot tub for use while we've visiting the cabin. The cabin is used only about 1 weekend a month in the summer and tub will be drained and filled each trip.
About this build:
I'm sorry but this thread is going to drag on for nearly a year. My goal is to have this tub up in running by Fall of 2017 - about 10 months from now. There is a project I must complete (Install new gas water pump, water line, water reservoir, and plumb the cabin) before the tub can be installed. It's winter and no work can be done at the cabin until May. Plus I'm a family man with 2 small boys - it's difficult to find shop time nowadays. All of this adds up to a long timeline.
Challenges:
1)The cabin is difficult to access. There is no road leading to the cabin. You must drive up a fairly rough forest service road until you reach the lake, then take a fishing boat across to the cabin. This is a time consuming exercise and makes it impossible to transport a traditional hot tub short of hiring a helicopter or something.
2) No power at the cabin. The cabin does have a basic 12V solar power system for running lights and charging electronics, but nothing robust enough to run a pump.
3) No treated water at the cabin. We pack in all drinking water. Bathing and dish water currently comes from the lake. Hot tub will need to be filled with lakewater pumped up via a gas powered water pump.
Goals:
1) Big enough to fit my family of 4 (2 small kids) if we don't mind being cozy.
2) Big enough so I don't feel weird sharing the tub with another dude.
3) Able to heat the water in a day. If I fill it in the morning, I want to be able to use it that evening.
Here's a picture of the cabin. Plan is to put the tub to the immediate left of the deck. I'll likely take out a section of the railing there so you can access the tub directly from the deck. That stump is going to have to go..

- - - Updated - - -
This portion reserved for cost tracking. As I update the thread, I will update costs list.
Costs are in Canadian dollars and include any taxes, shipping, etc. Things cost more in Canada and not just due to the exchange rate. For you americans reading this, your cost would likely be between 1/2 to 2/3 of the cost shown below.
Boiler costs:
- Compressor tank, steel - $60
- 40' of 3/4" soft copper (Type K) - $140
- Pipe fittings - $35
- Brass ball valves - $75
- - - Updated - - -
While I can't access the cabin until Spring, there is some work I can do ahead of time. Like build the wood fired boiler!
Building the boiler is going to be a challenge for 4 reasons.
1) I want to heat a lot of very cold water in a rather short amount of time. The boiler needs to transfer a LOT of heat.
2) I don't have power for a pump! Water needs to self-circulate through the boiler using the properties of thermosiphon effect. This requires careful design. Lines must be carefully sloped - If air is trapped in the lines/boiler it won't work. Also the lines must allow for easy/high flow as the thermosiphon effect isn't very strong. https://en.wikipedia.org/wiki/Thermosiphon
3) In the winter it's likely that the boiler will freeze overnight when the fire goes out. I need to be able to easily drain the boiler without draining the tub so that it can be drained overnight.
4) Boiler need to be fairly light weight so that I can carry it from fishing boat to cabin, etc.
All of these challenges are unique to my situation and probably wouldn't apply if you were doing this in your back yard.
Here's a couple of pictures showing the intended design:


The boiler is designed with 2 "heating loops". The blue line represents a coil of copper tubing. The Green represents steel piping leading to an steel reservoir in the center.
You may be scratching your head at this design. The reason I chose this design is based on the materials I'm working with and a desire to maximize efficiency. The tank in the center's main purpose is to divert hot exhaust gasses around the tank and through the copper coil. But, if I'm going to have such a diverter in there I might as well take advantage of the situation and run water through it as well to maximize heat transfer.
- - - Updated - - -
Here's a pic of the raw materials.
The tall tank doesn't end up getting used (for boiler material anyway). This is an old tank I had laying around and was going to be my boiler casing until I pulled it out of the weeds and realized it was too narrow.
The blue compressor tank will be the main body of the boiler. I picked it up from the local metal recycler for $40. It came with some bonus air pressure gauges and an air pressure regulator that I'll keep for a rainy day.
The pink steel tank is an empty helium tank. It came as part of a "party balloon kit" from Costco. My wife LOVES the fact I used it for this build instead of throwing in the garbage.

- - - Updated - - -
1st step - preparing the boiler body:
- Remove all compressor fittings, air gauges, etc.
- Cut sheetmetal off the top that compressor motor used to be bolted to.
- Cut top off of tank.
- Build hinge for top. To remain openable for easy access.

- - - Updated - - -
Here's a picture showing the forming of the copper coil.
Managed for find this length in my local online classifieds and met a nice old couple in the process. Total length used was right at 40'
I had planned to fill the coil with water then freeze before bending. Unfortunately I couldn't fit the coil in the deepfreeze and the weather has been unseasonably warm outside. Luckily, I was able to make due without. The radius of the bend wasn't too tight and only resulted in a slight ovaling of the tube.
For anyone considering doing this themselves. 3/4" type K copper was difficult to work with. It's hard to bend by hand. I'd say it's at the limit of what is usable for something like this. If your situation permits, consider using smaller diameter, or the other type (Type L?) that's a little thinner. Forming this coil wasn't too bad, but bending it later to line up with fittings in the boiler was difficult.
Crud. I'm out of attachment space. Anyone know how to get more? I've already resized the pictures as small as I can.
Background:
My family owns a rustic cabin up at a mountain lake in the woods. Being that it's a mountain lake in Canada it's often quite cold up there! I want to build a hot tub for use while we've visiting the cabin. The cabin is used only about 1 weekend a month in the summer and tub will be drained and filled each trip.
About this build:
I'm sorry but this thread is going to drag on for nearly a year. My goal is to have this tub up in running by Fall of 2017 - about 10 months from now. There is a project I must complete (Install new gas water pump, water line, water reservoir, and plumb the cabin) before the tub can be installed. It's winter and no work can be done at the cabin until May. Plus I'm a family man with 2 small boys - it's difficult to find shop time nowadays. All of this adds up to a long timeline.
Challenges:
1)The cabin is difficult to access. There is no road leading to the cabin. You must drive up a fairly rough forest service road until you reach the lake, then take a fishing boat across to the cabin. This is a time consuming exercise and makes it impossible to transport a traditional hot tub short of hiring a helicopter or something.
2) No power at the cabin. The cabin does have a basic 12V solar power system for running lights and charging electronics, but nothing robust enough to run a pump.
3) No treated water at the cabin. We pack in all drinking water. Bathing and dish water currently comes from the lake. Hot tub will need to be filled with lakewater pumped up via a gas powered water pump.
Goals:
1) Big enough to fit my family of 4 (2 small kids) if we don't mind being cozy.
2) Big enough so I don't feel weird sharing the tub with another dude.
3) Able to heat the water in a day. If I fill it in the morning, I want to be able to use it that evening.
Here's a picture of the cabin. Plan is to put the tub to the immediate left of the deck. I'll likely take out a section of the railing there so you can access the tub directly from the deck. That stump is going to have to go..
- - - Updated - - -
This portion reserved for cost tracking. As I update the thread, I will update costs list.
Costs are in Canadian dollars and include any taxes, shipping, etc. Things cost more in Canada and not just due to the exchange rate. For you americans reading this, your cost would likely be between 1/2 to 2/3 of the cost shown below.
Boiler costs:
- Compressor tank, steel - $60
- 40' of 3/4" soft copper (Type K) - $140
- Pipe fittings - $35
- Brass ball valves - $75
- - - Updated - - -
While I can't access the cabin until Spring, there is some work I can do ahead of time. Like build the wood fired boiler!
Building the boiler is going to be a challenge for 4 reasons.
1) I want to heat a lot of very cold water in a rather short amount of time. The boiler needs to transfer a LOT of heat.
2) I don't have power for a pump! Water needs to self-circulate through the boiler using the properties of thermosiphon effect. This requires careful design. Lines must be carefully sloped - If air is trapped in the lines/boiler it won't work. Also the lines must allow for easy/high flow as the thermosiphon effect isn't very strong. https://en.wikipedia.org/wiki/Thermosiphon
3) In the winter it's likely that the boiler will freeze overnight when the fire goes out. I need to be able to easily drain the boiler without draining the tub so that it can be drained overnight.
4) Boiler need to be fairly light weight so that I can carry it from fishing boat to cabin, etc.
All of these challenges are unique to my situation and probably wouldn't apply if you were doing this in your back yard.
Here's a couple of pictures showing the intended design:
The boiler is designed with 2 "heating loops". The blue line represents a coil of copper tubing. The Green represents steel piping leading to an steel reservoir in the center.
You may be scratching your head at this design. The reason I chose this design is based on the materials I'm working with and a desire to maximize efficiency. The tank in the center's main purpose is to divert hot exhaust gasses around the tank and through the copper coil. But, if I'm going to have such a diverter in there I might as well take advantage of the situation and run water through it as well to maximize heat transfer.
- - - Updated - - -
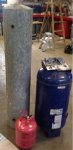
Here's a pic of the raw materials.
The tall tank doesn't end up getting used (for boiler material anyway). This is an old tank I had laying around and was going to be my boiler casing until I pulled it out of the weeds and realized it was too narrow.
The blue compressor tank will be the main body of the boiler. I picked it up from the local metal recycler for $40. It came with some bonus air pressure gauges and an air pressure regulator that I'll keep for a rainy day.
The pink steel tank is an empty helium tank. It came as part of a "party balloon kit" from Costco. My wife LOVES the fact I used it for this build instead of throwing in the garbage.
- - - Updated - - -
1st step - preparing the boiler body:
- Remove all compressor fittings, air gauges, etc.
- Cut sheetmetal off the top that compressor motor used to be bolted to.
- Cut top off of tank.
- Build hinge for top. To remain openable for easy access.
- - - Updated - - -
Here's a picture showing the forming of the copper coil.
Managed for find this length in my local online classifieds and met a nice old couple in the process. Total length used was right at 40'
I had planned to fill the coil with water then freeze before bending. Unfortunately I couldn't fit the coil in the deepfreeze and the weather has been unseasonably warm outside. Luckily, I was able to make due without. The radius of the bend wasn't too tight and only resulted in a slight ovaling of the tube.
For anyone considering doing this themselves. 3/4" type K copper was difficult to work with. It's hard to bend by hand. I'd say it's at the limit of what is usable for something like this. If your situation permits, consider using smaller diameter, or the other type (Type L?) that's a little thinner. Forming this coil wasn't too bad, but bending it later to line up with fittings in the boiler was difficult.
Crud. I'm out of attachment space. Anyone know how to get more? I've already resized the pictures as small as I can.