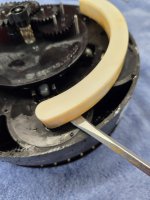
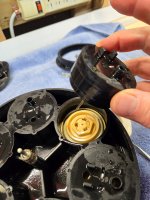
PCC2000 Valve Module Repair Journey

gratefulmjc

Member
May 24, 2023
11
Fairfax County, VA
Pool Size
30000
Surface
Plaster
Chlorine
Salt Water Generator
SWG Type
Hayward Aqua Rite (T-15)
First TFP post...

Seven years ago, I fell in love with a pool that came with a girl...errrrr, the other way around. The first year I respectfully watched her netting and sweeping the pool virtually everyday. She said it was "therapeutic"...and I gave her the benefit of the doubt :goodjob:. As an engineer (electrical, since retired), my curiosity eventually got the better of me and I started poking around the pool to see how it worked. I was truly starting from scratch; the extent of my pool knowledge was growing up watching the lifeguards at the local pool do red, green, and blue chemistry.

From the start it was obvious watching those pop-up thingamajigs in the pool floor that they were not operating as intended...some never popped up and one was always up...that just couldn't be right. It didn't take long to get schooled up on those pop-ups, valve modules, skimmers, drains, pumps, etc. and figure out that the IFCS (PCC2000: 8 rotating heads, 2 pairs of down jets, and two stationary drain-oriented heads) had suffered from years of neglect...a lot of my SO's "therapy" was making up for the fact that the IFCS needed some serious attention. So I got the head removal tool, cleaned the debris from the rescue-able heads, replaced the broken heads, and replaced both the 4-port and 6-port valve modules. Viola, no more "therapy" needed. By the way, as I was schooling myself on the PCC2000, the tech support at Paramount provided tons of excellent info...I had many fruitful email exchanges with them...they are super helpful...they even provided a copy of the design drawing that they did for the pool builder (who could have done a better job following the drawing (another thread!).

Over the intervening years, having moved in with the poolgirl, I've had to replace each valve module (I guessing) two times...that's roughly $1K of replacements because I couldn't find a rebuild kit or any info anywhere online on how to do it. Most recently, I replaced the 6-port valve module a week ago...it had, at least in my case, the classic single drooping valve head (ie, it would not lift up flush to the bottom plate of the valve module) which resulted in one pop-up always staying up, I had to buy a new valve module when only 1 of 6 ports was broken...arrrgghhh.

Tired of spending the $$$ (and yes, I'm that guy...probably more so than the $$$), I decided to tear down the broken valve module (what's there to lose?). It took a lot of head scratching but I finally got the problematic port disassembled along with a good port so I could do a comparison (getting out of an Escape Room is easier). (Lotta guessing to follow so mentally add "appears" to each sentence. And I will claim credit for cases where I get something right for the wrong reason ;)).

The problem seems to be with a rubber piece that is shaped like the screw-on retainer ring on a baby bottle...I'll call it a bellows for lack of a better term. I think that the molded shape of the bellows makes it act like a spring that keeps the valve head closed against the bottom plate of the valve module to cut off water to that port. On the problematic port, the bellows had lost its springy mojo and sagged letting the valve head droop and water pass through. On the good port, the bellows still has its springy mojo and kept the valve head in place. I guess that perhaps the problematic bellows could have a hole causing it to lose pressure and sag but looking at the construction, it doesn't look like the bellows is part of an airtight space...but who knows. (Something makes me mentally compare the overall design to that of a balanced scuba regulator.)

So, what's next? Sooner or later another valve head on one of my two valve modules will fail. Instead of throwing this broken valve module away like I have in the past, I will stash it away to use for spare parts for the next valve module failure. If that stinking 50-cent bellows is indeed the problem, I'll replace it with a used, working bellows from my spare valve module to see if it fixes the broken valve head. I'm more than willing to spend $500 dollars of my time to save $250!

Over the next week or so, in the event that someone is interested, I'll post some pictures showing the disassembly steps along with both a good and a problematic bellows.

If anyone else has some experience with this, I sure would appreciate it if you would add a reply to this thread. I hope I'm not reinventing the wheel but I couldn't find any posts on this other than people asking the "can I repair it question" and always ending up buying a new valve module. Apologies in advance if this is common knowledge.

Wish me luck.

PS. The Europeans' Right-to-Repair laws should be imported (as well, regarding our proposals, if its good enough for farm equipment, it should be good enough for lotsa stuff).
 
Last edited:
Welcome to TFP! :wave:

While I don't have a Paramount system (A&A guy here), you having one and willing to post steps that may help others with the same system is most welcome. Sadly, many manufacturers don't make rebuild kits or simple parts available and would rather sell you another complete unit.
 
Hi @mknauss and @proavia. Thanks for the greetings.

About 7 months ago, I stumbled on a forum for another one of my pastimes and learned more in that period than I could ever learn in my lifetime so it was a natural jump to seek out a pool community when I was scratching my head on the valve module.

I look forward to doing the same here at TFP. Poking around a little before my first post tells me TFP will be a valuable resource on many levels...techniques, time, $$$, blood pressure, etc.

ETA: and thanks, I assume to one of you guys, for the move to the correct forum.
 
Last edited:
I'm interested in your journey! I have a Paramount system but I'm only starting my first full year learning about pools period so I'm focused on other things right now such as maintenance, water science, etc. However, you sound very much like me - I hate waste and I'd rather spend time formulating a fix vs 'toss and replace'.

I do have a question now - the Paramount system and the pool in general wasn't very well maintained. Based on yours and others observations, the valves are probably shot. Should I just go ahead and buy 2 new valves (I have 2 black units in the ground)? This way I can focus on things like popup heads, etc as I have the knowledge that both units have good working parts. Your thoughts...
 
Hi @pktaske. Where to start? First of all, welcome aboard the PCC2000 express. When I got the kinks worked out of mine, it has done a really good job getting the debris on the bottom into the main drain for collection by the debris cannister (mine is mounted in the pool deck next to the skimmer).

Please keep in mind that the below reflects one person's universe of issues/solutions. I welcome feedback from others on their experiences/issues/solutions...and corrections to anything I may have gotten wrong.

Before you go further...you should stash a PDF of the Owner's Manual on your computer...you'll find that you'll refer to it often enough (part numbers, pictures, etc.) that you'll get tired of (re-)Googling it and (re-)downloading it. You can find a copy (and other useful Paramount docs) at https://www.1paramount.com/support/download-manuals/. There is also a FAQ on the website in the Support section (PCC2000 System - FAQ - Paramount Pool & Spa Systems) that has some good info (it's worth reading the section on the PCC2000 before you do anything). Also a lot of good info at Technical Forum.

My three basic functional issues (ignoring lesser issues like a broken pressure gauge or a band clamp knob, etc.) that you could be experiencing have been:

1. Pool Service Company mistake. I haven't gotten comfortable with shutting down the pool each fall so a Service Company does that (and opens the pool in the spring)...maybe some day. Like you, I have two water valves (black "pressure cookers" with a band clamp securing the upper and lower halves [inside of which is the valve module]). The first is a four-port water valve which receives water from the pump/filter. It has three output ports each sequentially supplying water to three cleaning heads (aka pop upa) in the shallow end with the fourth output port (actually 3 ports ganged together into one) supplying water to the second water valve. The second water valve is a six-port version that when it is receiving water from the first water valve, sequentially supplies water to five cleaning heads in the mid-depth and deep end of the pool and to the deep end down jets (see attachment). The mistake I've seen the Service Company make on multiple occasions occurs when they re-install the valve modules in the water valves that were removed for the winter. Firstly, the valve module for the four-port water valve is not interchangeable with the valve module for the six-port water valve...you have to have the correct module in the correct water valve. And the four-port water valve has to be oriented correctly so that the fourth, ganged port is over the water line that goes to the second water valve (Owner's Manual has info and pics). Our current Service Company is re-installing the valve modules correctly...but doesn't stick around for the time it takes to see if all the cleaning heads are popping up/down, etc. Arrrrghhh.

2. Dirty or broken valve module.
  1. Dirty: I've found debris in various places in the valve module...like a leaf stem in the opening that controls which port opens. The debris keeps a small sphere from rolling over the opening. The sphere needs to block the opening to get the port to close. I imagine that there are other spots where debris can lodge causing issues. Look it over and remove any debris. Paramount recommends holding the valve module in the pool and swishing it around to remove any grit, etc. A symptom of this issue is a cleaning head that is up when it should not be AND is jetting water. FWIW, I've never found debris that kept a port from opening but I imagine its possible.
  2. Broken: A part in the valve module is broken causing a port to always be open (I've yet to find a valve module issue where a port is always closed but...). As I mentioned above, my experience is that one of the valve heads (white round piece with three large and three small vanes on it) droops down vice being pulled up flush with the bottom of the valve module. The symptom is the same as above: a cleaning head that is up when it should not be AND is jetting water.
3. Stuck cleaning heads...ones that never come up/go down or won't rotate thru 360 degrees (each time the cleaning head pops up/down, it rotates, I believe, 15 degrees). The cleaning head is kept retracted, level with the pool bottom, by a spring. When the valve directs water to a cleaning head, the pressure overcomes the spring tension and the head pops up. I've found two issues; dirty or broken cleaning heads:
  1. Dirty: There is grit in the cleaning head that prevents it from going up or down. You'll need to remove the cleaning head from the pool bottom and clean it. If you have a cleaning head that is always up but there is no water jetting from it, it's stuck up. If you have a cleaning head that doesn't come up when it should and you can feel water jetting up from the pool bottom from around the perimeter of the cleaning head, it's stuck down. Or if a rotating cleaning head doesn't rotate (FWIW, some are not supposed to rotate...I have two; they are next to and point at the drain...and they stay up all the time controlled by a ball valve next to the water valves).
    1. Removal:
      (note all the dirt that comes out when the cleaning head is removed from the bottom of the pool and the guy "waving" even more dirt out of the opening after the cleaning head is removed. Use a Paramount tool to remove a cleaning head (004-552-5440-00 and/or 004-552-5452-00 depending on the cleaning heads you have. I found that the cleaning heads (at least the first time) do not want to come out. Firstly, grit may keep them from rotating. Secondly, dirt may then keep them from being pulled upwards out of the pool bottom. Patience and some elbow grease will likely be needed (you can also try using a garden hose and nozzle to jet some water around the perimeter of the cleaning head to flush out dirt to free it up). Also, I don't bother putting the tool on the end of the pole...even though the guy in the video has the tool on the end of the pole, note that he is in the pool twisting the tool by hand.
    2. Cleaning: Here is a video that among other things shows how to disassemble a cleaning head:
      . FWIW, the shaft will NOT twist out as easily as shown in the video...keep it wet for lubrication, use a rag for better grip, and TWIST (in the correct direction!).
  2. Broken: When you disassemble a cleaning head, you'll see that there is a plastic collar around the shaft the holds one end of the spring in place. I've found broken collars that keep the cleaning head from going down (I think it's down...it's been a long time). I was never able to find a replacement collar and was forced to buy an entire new head (but I kept the old one...it'll come in handy some day).
You might have all three of the above issues.


My thoughts:

1. Take the band clamps off your water valves (pump(s) off of course and pressure bled off) to get a look at the valve modules.
  1. Pull the modules out of the valves to determine if 1) the correct modules were in the correct valves and 2) the modules were oriented correctly (FWIW, a six port module can't be mis-oriented). See the pics in the Owner's Manual.
  2. Make sure there is no debris lurking somewhere in the valve modules. Swish them around in the pool as recommended by Paramount (but that never worked for me).
  3. See if any of the valve heads on the bottom of the valve module are drooping away from the bottom of the valve module...those that do are unfortunately broken. My functioning valve heads take some effort to pull away from the bottom of the valve module (BTW, Paramount says that's a no-no) and pull back up against the bottom of the valve module when released.
  4. Make sure everything else looks in order and that all parts are present (e.g., the flow optimizer ring on the bottom of the valve module is present).
  5. Reassemble the valves...correct module in correct valve and with the correct orientation. Even if a port or two is not working, you will have an idea of why/why not certain cleaning heads are popping up.
I hate to recommend spending the $$$ on one or perhaps two new valve modules but that might be the easiest path and one that will ensure the valves are functioning properly. Otherwise, if both valve modules are bad, you could scavenge parts from one to get the other working and only have to buy one new module...not sure if that's worth it. Or I can send you some parts from my spare...lemme know.

FWIW, a few weeks ago I got my six-port replacement valve module from ePoolSupply for $229.95 (less a $5 discount) with free shipping: Paramount Water Valve 6-Port Gear Module (FWIW, I have no skin in the game...it was the best price on an OEM part).

2. For the heads stuck up/down or are not rotating, pull them from the pool bottom, disassemble them to clean out the dirt and check for broken parts. Make sure that you keep track of which cleaning head comes out of which socket in the pool bottom...some might be different (nozzle size, fixed vs rotating, etc.). Replace as needed.

Lemme know if you have any questions...happy to help. And enjoy your weekend at the bottom of the pool!

PS. As I was getting up to speed on the PCC2000, it became obvious that my gal's pool documentation was not complete...she was missing the Paramount drawing (think blueprint) of her PCC2000. Since there is an infinite variety of pool shapes, sizes, and features, Paramount prepares a drawing for the pool builder spec'ing out the PCC2000 (number, type, and location of popups, valve configuration, etc.). I emailed Paramount who replied asking for some info in order to find the drawing (and maybe to confirm my request was legit) which I supplied. And, voila, they sent me a copy (as I mentioned in the OP, Paramount has been super). A very useful doc to have...a copy of mine is attached.
 

Attachments

  • PCC2000DrawingNoName.pdf
    510.1 KB · Views: 21
  • Like
Reactions: proavia
Hi @pktaske. Where to start? First of all, welcome aboard the PCC2000 express. When I got the kinks worked out of mine, it has done a really good job getting the debris on the bottom into the main drain for collection by the debris cannister (mine is mounted in the pool deck next to the skimmer).

Please keep in mind that the below reflects one person's universe of issues/solutions. I welcome feedback from others on their experiences/issues/solutions...and corrections to anything I may have gotten wrong.

Before you go further...you should stash a PDF of the Owner's Manual on your computer...you'll find that you'll refer to it often enough (part numbers, pictures, etc.) that you'll get tired of (re-)Googling it and (re-)downloading it. You can find a copy (and other useful Paramount docs) at https://www.1paramount.com/support/download-manuals/. There is also a FAQ on the website in the Support section (PCC2000 System - FAQ - Paramount Pool & Spa Systems) that has some good info (it's worth reading the section on the PCC2000 before you do anything). Also a lot of good info at Technical Forum.

My three basic functional issues (ignoring lesser issues like a broken pressure gauge or a band clamp knob, etc.) that you could be experiencing have been:

1. Pool Service Company mistake. I haven't gotten comfortable with shutting down the pool each fall so a Service Company does that (and opens the pool in the spring)...maybe some day. Like you, I have two water valves (black "pressure cookers" with a band clamp securing the upper and lower halves [inside of which is the valve module]). The first is a four-port water valve which receives water from the pump/filter. It has three output ports each sequentially supplying water to three cleaning heads (aka pop upa) in the shallow end with the fourth output port (actually 3 ports ganged together into one) supplying water to the second water valve. The second water valve is a six-port version that when it is receiving water from the first water valve, sequentially supplies water to five cleaning heads in the mid-depth and deep end of the pool and to the deep end down jets (see attachment). The mistake I've seen the Service Company make on multiple occasions occurs when they re-install the valve modules in the water valves that were removed for the winter. Firstly, the valve module for the four-port water valve is not interchangeable with the valve module for the six-port water valve...you have to have the correct module in the correct water valve. And the four-port water valve has to be oriented correctly so that the fourth, ganged port is over the water line that goes to the second water valve (Owner's Manual has info and pics). Our current Service Company is re-installing the valve modules correctly...but doesn't stick around for the time it takes to see if all the cleaning heads are popping up/down, etc. Arrrrghhh.

2. Dirty or broken valve module.
  1. Dirty: I've found debris in various places in the valve module...like a leaf stem in the opening that controls which port opens. The debris keeps a small sphere from rolling over the opening. The sphere needs to block the opening to get the port to close. I imagine that there are other spots where debris can lodge causing issues. Look it over and remove any debris. Paramount recommends holding the valve module in the pool and swishing it around to remove any grit, etc. A symptom of this issue is a cleaning head that is up when it should not be AND is jetting water. FWIW, I've never found debris that kept a port from opening but I imagine its possible.
  2. Broken: A part in the valve module is broken causing a port to always be open (I've yet to find a valve module issue where a port is always closed but...). As I mentioned above, my experience is that one of the valve heads (white round piece with three large and three small vanes on it) droops down vice being pulled up flush with the bottom of the valve module. The symptom is the same as above: a cleaning head that is up when it should not be AND is jetting water.
3. Stuck cleaning heads...ones that never come up/go down or won't rotate thru 360 degrees (each time the cleaning head pops up/down, it rotates, I believe, 15 degrees). The cleaning head is kept retracted, level with the pool bottom, by a spring. When the valve directs water to a cleaning head, the pressure overcomes the spring tension and the head pops up. I've found two issues; dirty or broken cleaning heads:
  1. Dirty: There is grit in the cleaning head that prevents it from going up or down. You'll need to remove the cleaning head from the pool bottom and clean it. If you have a cleaning head that is always up but there is no water jetting from it, it's stuck up. If you have a cleaning head that doesn't come up when it should and you can feel water jetting up from the pool bottom from around the perimeter of the cleaning head, it's stuck down. Or if a rotating cleaning head doesn't rotate (FWIW, some are not supposed to rotate...I have two; they are next to and point at the drain...and they stay up all the time controlled by a ball valve next to the water valves).
    1. Removal:
      (note all the dirt that comes out when the cleaning head is removed from the bottom of the pool and the guy "waving" even more dirt out of the opening after the cleaning head is removed. Use a Paramount tool to remove a cleaning head (004-552-5440-00 and/or 004-552-5452-00 depending on the cleaning heads you have. I found that the cleaning heads (at least the first time) do not want to come out. Firstly, grit may keep them from rotating. Secondly, dirt may then keep them from being pulled upwards out of the pool bottom. Patience and some elbow grease will likely be needed (you can also try using a garden hose and nozzle to jet some water around the perimeter of the cleaning head to flush out dirt to free it up). Also, I don't bother putting the tool on the end of the pole...even though the guy in the video has the tool on the end of the pole, note that he is in the pool twisting the tool by hand.
    2. Cleaning: Here is a video that among other things shows how to disassemble a cleaning head:
      . FWIW, the shaft will NOT twist out as easily as shown in the video...keep it wet for lubrication, use a rag for better grip, and TWIST (in the correct direction!).
  2. Broken: When you disassemble a cleaning head, you'll see that there is a plastic collar around the shaft the holds one end of the spring in place. I've found broken collars that keep the cleaning head from going down (I think it's down...it's been a long time). I was never able to find a replacement collar and was forced to buy an entire new head (but I kept the old one...it'll come in handy some day).
You might have all three of the above issues.


My thoughts:

1. Take the band clamps off your water valves (pump(s) off of course and pressure bled off) to get a look at the valve modules.
  1. Pull the modules out of the valves to determine if 1) the correct modules were in the correct valves and 2) the modules were oriented correctly (FWIW, a six port module can't be mis-oriented). See the pics in the Owner's Manual.
  2. Make sure there is no debris lurking somewhere in the valve modules. Swish them around in the pool as recommended by Paramount (but that never worked for me).
  3. See if any of the valve heads on the bottom of the valve module are drooping away from the bottom of the valve module...those that do are unfortunately broken. My functioning valve heads take some effort to pull away from the bottom of the valve module (BTW, Paramount says that's a no-no) and pull back up against the bottom of the valve module when released.
  4. Make sure everything else looks in order and that all parts are present (e.g., the flow optimizer ring on the bottom of the valve module is present).
  5. Reassemble the valves...correct module in correct valve and with the correct orientation. Even if a port or two is not working, you will have an idea of why/why not certain cleaning heads are popping up.
I hate to recommend spending the $$$ on one or perhaps two new valve modules but that might be the easiest path and one that will ensure the valves are functioning properly. Otherwise, if both valve modules are bad, you could scavenge parts from one to get the other working and only have to buy one new module...not sure if that's worth it. Or I can send you some parts from my spare...lemme know.

FWIW, a few weeks ago I got my six-port replacement valve module from ePoolSupply for $229.95 (less a $5 discount) with free shipping: Paramount Water Valve 6-Port Gear Module (FWIW, I have no skin in the game...it was the best price on an OEM part).

2. For the heads stuck up/down or are not rotating, pull them from the pool bottom, disassemble them to clean out the dirt and check for broken parts. Make sure that you keep track of which cleaning head comes out of which socket in the pool bottom...some might be different (nozzle size, fixed vs rotating, etc.). Replace as needed.

Lemme know if you have any questions...happy to help. And enjoy your weekend at the bottom of the pool!

PS. As I was getting up to speed on the PCC2000, it became obvious that my gal's pool documentation was not complete...she was missing the Paramount drawing (think blueprint) of her PCC2000. Since there is an infinite variety of pool shapes, sizes, and features, Paramount prepares a drawing for the pool builder spec'ing out the PCC2000 (number, type, and location of popups, valve configuration, etc.). I emailed Paramount who replied asking for some info in order to find the drawing (and maybe to confirm my request was legit) which I supplied. And, voila, they sent me a copy (as I mentioned in the OP, Paramount has been super). A very useful doc to have...a copy of mine is attached.
This helped immensely! Thanks for taking the time. I ordered a new valve and now everything is cycling correctly but I have a bunch of malfunctioning heads. I'm going to build a tool to remove the heads and I'll chime in with the results.

Just an FYI, I closed my pool and opened it myself. Opening it was a challenge as a pine tree crashed into it during a tornado. What a mess. But you can do it....!
 
  • Like
Reactions: gratefulmjc
My pleasure.

Save the old valve module!

Regarding a DIY tool...
Re: What can be done with Paramount pool cleaner heads to re

The three long curved slots along the edge are where you are supposed to turn them. They make a special tool for removing them that you can buy; for mine I have used a 2x4 with 3 tiny nails not pounded in all the way. If you search online you buy the tool or at least see what it loos like so you can make something similar.
I tried the nails-in-the-2×4 tool and it worked on "cooperative" heads but not on the heads that were grit-locked into the socket in the pool bottom...or the heads where the #$!% pool builder ran a screw through the side of the socket into something (a wooden brace to hold the socket in place while poring the concrete?) and left a bit of the top of the screw exposed to bind against the pop up head. I'm interested to see what you come up with.

A chainsaw should never have to be part of a pool opening kit!
 
First TFP post...

Seven years ago, I fell in love with a pool that came with a girl...errrrr, the other way around. The first year I respectfully watched her netting and sweeping the pool virtually everyday. She said it was "therapeutic"...and I gave her the benefit of the doubt :goodjob:. As an engineer (electrical, since retired), my curiosity eventually got the better of me and I started poking around the pool to see how it worked. I was truly starting from scratch; the extent of my pool knowledge was growing up watching the lifeguards at the local pool do red, green, and blue chemistry.

From the start it was obvious watching those pop-up thingamajigs in the pool floor that they were not operating as intended...some never popped up and one was always up...that just couldn't be right. It didn't take long to get schooled up on those pop-ups, valve modules, skimmers, drains, pumps, etc. and figure out that the IFCS (PCC2000: 8 rotating heads, 2 pairs of down jets, and two stationary drain-oriented heads) had suffered from years of neglect...a lot of my SO's "therapy" was making up for the fact that the IFCS needed some serious attention. So I got the head removal tool, cleaned the debris from the rescue-able heads, replaced the broken heads, and replaced both the 4-port and 6-port valve modules. Viola, no more "therapy" needed. By the way, as I was schooling myself on the PCC2000, the tech support at Paramount provided tons of excellent info...I had many fruitful email exchanges with them...they are super helpful...they even provided a copy of the design drawing that they did for the pool builder (who could have done a better job following the drawing (another thread!).

Over the intervening years, having moved in with the poolgirl, I've had to replace each valve module (I guessing) two times...that's roughly $1K of replacements because I couldn't find a rebuild kit or any info anywhere online on how to do it. Most recently, I replaced the 6-port valve module a week ago...it had, at least in my case, the classic single drooping valve head (ie, it would not lift up flush to the bottom plate of the valve module) which resulted in one pop-up always staying up, I had to buy a new valve module when only 1 of 6 ports was broken...arrrgghhh.

Tired of spending the $$$ (and yes, I'm that guy...probably more so than the $$$), I decided to tear down the broken valve module (what's there to lose?). It took a lot of head scratching but I finally got the problematic port disassembled along with a good port so I could do a comparison (getting out of an Escape Room is easier). (Lotta guessing to follow so mentally add "appears" to each sentence. And I will claim credit for cases where I get something right for the wrong reason ;)).

The problem seems to be with a rubber piece that is shaped like the screw-on retainer ring on a baby bottle...I'll call it a bellows for lack of a better term. I think that the molded shape of the bellows makes it act like a spring that keeps the valve head closed against the bottom plate of the valve module to cut off water to that port. On the problematic port, the bellows had lost its springy mojo and sagged letting the valve head droop and water pass through. On the good port, the bellows still has its springy mojo and kept the valve head in place. I guess that perhaps the problematic bellows could have a hole causing it to lose pressure and sag but looking at the construction, it doesn't look like the bellows is part of an airtight space...but who knows. (Something makes me mentally compare the overall design to that of a balanced scuba regulator.)

So, what's next? Sooner or later another valve head on one of my two valve modules will fail. Instead of throwing this broken valve module away like I have in the past, I will stash it away to use for spare parts for the next valve module failure. If that stinking 50-cent bellows is indeed the problem, I'll replace it with a used, working bellows from my spare valve module to see if it fixes the broken valve head. I'm more than willing to spend $500 dollars of my time to save $250!

Over the next week or so, in the event that someone is interested, I'll post some pictures showing the disassembly steps along with both a good and a problematic bellows.

If anyone else has some experience with this, I sure would appreciate it if you would add a reply to this thread. I hope I'm not reinventing the wheel but I couldn't find any posts on this other than people asking the "can I repair it question" and always ending up buying a new valve module. Apologies in advance if this is common knowledge.

Wish me luck.

PS. The Europeans' Right-to-Repair laws should be imported (as well, regarding our proposals, if its good enough for farm equipment, it should be good enough for lotsa stuff).
I would very much be interested in how to disassemble the valve bellows. Like you, I needed to replace a 6 port module. When it goes bad, I would like to fix an individual valve module rather than buy a complete unit. Paramount is a little secretive about how the module is actually built. Thanks in advance.
 
Hi @Billybob4. My apologies, I've gotten behind schedule with my disassembly project due to some ad hoc high priority projects and a couple of trips out of town. I'll follow thru when I get home after the Independence Day holiday.
 

Enjoying this content?

Support TFP with a donation.

Give Support
Well, they say that necessity is the mother of invention, or in my case, motivation. Warning, not having a parts diagram, the names of the components I use below are of my own making.

A few days ago I opened the pool for the summer and voila (French for $&!#!!!) the Cleaner Heads in the pool floor were not popping up one at a time. Specifically, the six Cleaner Heads fed from my Six-port Valve Module (which itself is fed from the Four-port Valve Module) were sequentially popping up at the same time the three Cleaner Heads fed from my Four-port Valve Module were sequentially popping up. My guess, having been down this road before, was that the valve on the Four-port Valve Module that is intended to periodically open to feed water to the Six-port Valve Module had failed open, causing water to constantly flow to the Six-port Valve Module.

After removing the Four-port Valve Module from the poolside Valve Housing, a look at the bottom side of the Valve Module confirmed my suspicion...the Valve Head in the center of the three connected Valve Chambers on the Four-port Valve Module was not retracted against the bottom of the Valve Module (red arrow). This allowed water to constantly flow to the Six-port Valve Module instead of, as intended, after the three Cleaner Heads on the Four-port Valve Module had sequentially popped up.
01_BottomBroken.jpg

Earlier in this thread, I described tearing down a Six-port Valve Module that had the same open Valve Head issue. I found that what I called the "Bellows" had failed causing the Valve Head to remain open (I will show a comparison of a good and bad Bellows later in this post/series of posts).

Using the steps I learned from last summer's Valve Module teardown, I took this year's problem child apart:

1. After noting or marking the orientation of the Stationary Ring Gear (needed for reassembly so that its screw holes are aligned with the screw holes in the Valve Module), I removed the four screws holding the Stationary Ring Gear in place. CAUTION: the Stationary Ring Gear also serves as a retainer for six Valve Port Chamber Balls (red arrows)...be aware that they will go skittering off behind your hot water heater if you lift, tilt, etc. the Valve Module with the Stationary Ring Gear removed.
02_RemoveScrews.jpg 03_GearRingRemoved.jpg 05_CollectChamberBalls.jpg

Note that I found some debris (red arrow) in the unit which I cleaned out.
04_Debris.jpg

2. I removed the Chamber Connector Channel by first loosening it by gently prying it upwards with a screwdriver and then, while grasping both ends, lifted it straight up and off. I imagine this component is unique to a Four-port Valve Module (I know it's not on a Six-port Valve Module), so my guess is you won't encounter this component on other types of Valve Modules.
06_RemoveConnectorChannel.jpg 07_ConnectorChannelRemoved.jpg

3. I removed the Impeller Gear by first gently prying it upwards, using a twisting motion, with a screwdriver to loosen it. Then, while grasping it with my fingers, I lifted it straight up and off. CAUTION: the Impeller Gear keeps the Gear Table Disk and it many gears in place. These gears will, like the Valve Port Chamber Balls, scatter behind all your shelves, HVAC equipment, etc. if you upset the Valve Module when you pull the Impeller Gear off or subsequently shake the Valve Module over your head in the post-Impeller Gear removal victory dance. Perhaps take a picture of the gears before removing the Impeller Gear so you know how to recover from a gear diaspora.
08_RemoveImpellerGear.jpg 09_ImpellerGearRemoved.jpg

(moving to next post due to max image limit).
 
Last edited:
  • Like
Reactions: bobhatfield
4. I removed the Gear Table Disk by simply lifting it off the Impeller Shaft and, without disturbing the gears, placed it out of the way to avoid knocking it over and scattering the gears during the following steps.

10_GearTableRemoved.jpg

5. I removed the Valve Chamber Cap from the problematic Valve Chamber by grasping the rim of the Outlet Port with needle nose pliers and pulling straight up (admittedly I did some gentle wiggling to get the cap to come off). I did not want to distort or break the Outlet Port rim as it is what connects the Valve Chamber to the Chamber Connector Channel. There are also two tabs that can be grasped to get the Cap off. CAUTION: be very gentle and careful...the tabs are used to hold a Valve Port Chamber Ball in place...you don't want to break one (though if, like me, you are scavenging parts from a broken Valve Module, you have a replacement).

Note: on this Four-port Valve Module, there are two types of Valve Chamber Caps. On the three Valve Chambers that are connected by the Chamber Connector Channel, you will see that the Outlet Port is open to the Valve Chamber so that water can flow among them through the Chamber Connector Channel. For the three Valve Chambers that individually supply water to an in-floor Cleaner Heads, the Outlet Port is closed.
11_RemoveChamberCap.jpg 12_ChamberCapRemoved.jpg

Inside the Valve Chamber you will find four components. From the outside perimeter moving in:
- The Bellows (flexible rubber(?) ring) under...
- The Bellows Cap (round plastic disk with a raised outer ridge) under...
- The Bellows Retaining Ring (round plastic disk with a raised hexagonal head) holding in place...
- The top end of the Valve Head (plastic, three-bladed "propeller")
13_BellowsAssembly.jpg

6. I removed the Bellows Retaining Ring by holding the bottom end of the Valve Head in place (on the bottom of the Valve Module) with one hand and grasping opposing hex faces on the Ring with channel lock pliers then twisting the Ring counter clockwise. To hold the bottom end of the Valve Head, I wedged my fingers between the Valve Head inner surface and the Valve Module with the intent of introducing "play" between the Bellows Retaining Ring and the Valve Head "propellers" to facilitate twisting the tabs on the inside of the Ring's hex head past the Valve Head's "propeller blades". I don't know if it helped or not but I got the Bellows Retaining Ring off without too much trouble.

Patience: the Bellows Retaining Ring will resist at first then come off...I started with very little twisting force and slowly twisted a little harder...and a little harder...then the Ring's tabs slipped past the "propeller blades" and the Ring came free. If you look closely at the Bellows Retaining Ring (second picture), you will see that three of the six tabs inside the hex head do not reach all the way to the bottom of the Ring...its these three tabs that the Valve Head "propeller blades" have to twist under to remove the Ring. The third picture shows the Bellow Retaining Ring twisted part way to the point needed to remove it.
15_RemoveBellowsAssemblyLockRing.jpg 14_BellowsAssemblyLockRingCloseUp.jpg 16_BellowsAssemblyLockRingHalfOff.jpg 17_BellowsAssemblyLockRingRemoved.jpg

(moving to next post due to max image limit)
 
Last edited:
7. I removed the remaining three components in the Valve Chamber by simply taking them out. First the Bellows Cap. Then the Valve Head (note the Valve Head has to be rotated to the proper orientation in order to remove it from the Valve Module...from the bottom). Lastly the Bellows. The fourth picture is a comparison of the failed Bellows seen in the third picture to the functional Bellows I removed from the broken Six-port Valve Module I saved when I replaced it last summer. The last picture is the disassembled Valve Module and tools I used.

18_BellowsAssemblyWasher.jpg 19_ValveRemoved.jpg 20_BollowsRemoved.jpg 23_BellowComparison.jpg 21_DisassembledUnit.jpg

8. Reassemble the the Valve Module in the reverse order of the above steps...if you got this far...you've got the rest.
Keep the following items in mind:
A. The opening the center of the Bellows needs fit properly onto the raised disk underneath the "propellers" on the top end of the Valve Head.
24_BellowsInstalled.jpg 25_ValveInstalled.jpg

B. The three vanes on the bottom of the Valve Head have a specific orientation relative to the Valve Module because one vane, though not obvious, is shorter than the other two...this short vane is the one the needs to point directly outward from the center of the Valve Module. Paramount was nice enough to emboss a hint on the bottom of the Valve Module. You need to maintain this orientation during the remainder of the assembly in order for the Valve Module to fit into the poolside Valve Housing.
27_ValveOrientation.jpg

(moving to next post due to max image limit)
 
Last edited:
C. In order to press the Impeller Gear completely onto the Impeller Shaft, I set the Valve Module on its side and used a screwdriver against the root of one of the blades of the Impeller to keep the Impeller Shaft from moving downward while I pressed downward with the ball of my thumb on the top of the Impeller Gear. CAUTION: make sure that the Impeller Gear teeth are aligned with the teeth of the gear they mesh with when you push the Impeller gear into place in order to prevent damaging the teeth on one or both of the gears.
32_ImpellerHeld.jpg

I reinstalled the Valve Module in the poolside Valve Housing and voila (French for He!! Yeah!) the Cleaner Heads are popping up as they should. I poked around online and saw that OEM Four-port Valve Modules are running about $263...a knockoff on Amazon is $174...nice savings...especially if you like DIYing anyway.

The disassembly/reassembly on the workbench took me 40 minutes...including both the disassembly of the old Valve Module to retrieve a replacement Bellows and snapping these (and other) pictures...so this is a relatively quick (and IMO, easy) project.

Please post comments to correct, upgrade, etc. any of the above and I'll edit if possible. Also, happy to answer any questions you might have.

Cheers, Mike.
 
Last edited:
  • Like
Reactions: Contentt
Hey Mike:

Excellent instructions! I have been replacing my six-port module about every two years, so being able to rebuild one will be a real money saver! After disassembly and inspection of my module, all six bellows look like you GOOD example and they are all very "springy". But two of them do not fit tightly against the chamber walls and will fall out if I turn the module upside down. I am thinking that may be my problem. Did you search for a place to buy new bellows? As a cheapskate engineer, I may try running a bead of silicon caulk at the bottom of the chamber and gluing the bellows in place. Thanks again for sharing your knowledge.
 
Hi @kdrob. Several years ago, when I got tired of spending the $$$ for replacement Valve Modules and telling myself there must be a way to repair them, I poked around the internet but didn't find any replacement parts.

Curious after reading your post, I poked around again and saw this on eBay:
Paramount Pool Module Valve Diaphragms for 2 port, 3 port, 4 port and 6 port | eBay

The listing says the Bellows (the seller calls them diaphragms) are aftermarket but claims they are better than original (hmmm). At $60 for six Bellows + $6 shipping they are very expensive (IMO) for what they are...but on the other hand it is a lot less than a new Valve Module...supply & demand. They do come with a 2 yr warranty...nice. And the reviews are positive. When I run out of spare Bellows, I will probably give them a shot.

Regarding the upside-down test...I never tried that. When examining a problematic Valve Module, the issue has always been the Port that had (what I called in the above posts) the Valve Head extending away from the body of the Valve Module (see the first picture in Post #11). But that is something I will try if I have a problematic Valve Module that doesn't have an extending Valve Head.

I have five spare Bellows and would be happy to send you replacements if the silicon caulk trick doesn't work.

Good luck...and let me know how the repair goes.

Fellow cheapskate engineer, Mike.
 
Mike:

It worked! I wanted to let it run for a couple days to make sure I didn't declare victory early. I sealed all six ports since everything was disassembled and I let the caulk cure overnight. There is one notable difference, it rotates slower now. I thought maybe the gears were installed incorrectly or I accidentally gummed them up with caulk, so I rebuilt it a second time to make sure no mistakes were made. It works as it should and I do not think the slower rotation is a problem. I conclude that the bellows shrink over time and then begin to leak.

Using your instructions it took me about 2 hours of labor and a $6 tube of caulk to save $230. We need to be thankful to for TFP hosting these forums as a means of sharing knowledge.

Until next time,
kdrob
 
  • Like
Reactions: gratefulmjc
We need to be thankful to for TFP hosting these forums as a means of sharing knowledge.
We are glad you have found the information helpful. Please, if you can, consider making a donation to TFP. We are staffed by volunteers and are registered as an IRS 501 (c) (3) charity and donations are what keeps the forum operating without advertisements.

Support TFP!
 
Thread Status
Hello , This thread has been inactive for over 60 days. New postings here are unlikely to be seen or responded to by other members. For better visibility, consider Starting A New Thread.