- Oct 16, 2016
- 86
- Pool Size
- 10000
- Surface
- Plaster
- Chlorine
- Salt Water Generator
- SWG Type
- Autopilot Digital Nano+ PPC2
I've been running this configuration for more than 500 hours now, so I'm confident to share it with the community as a possible solution to others who have had their intellibrite light die on them only to find out that replacing the poorly designed LED driver board is almost as much as replacing the whole light, or in a case like mine with a spa light, there is no OEM LED driver replacement. To do the replacement requires repurposing an existing pentair Intellibrite enclosure.
My Intellibrite 5g spa light (being used as a pool light for my smaller pool) died a while back. I built my own with some help from the Internet and some off the shelf 30 watt WS2811 Pixel modules from AliExpress. Following the recommendations of that youtube link, I swapped in a Quin-LED Dig Uno/ESP 32 controller which uses WLED software (free). I can now get millions of different colors and dozens of different lighting effects, plus its programmable, so you can design your own light shows and there are various modifications for the Dig-uno/esp 32 board, like microphones you can attach to have it change color to music, etc.
My pool is smaller and uses a spa light instead of the 10" pool light, but if you essentially double the recipe below and install two pixel modules, it *should" work exactly the same for the pool light, although I haven't tried it yet. That said, I've always been a little frustrated with the lighting level from the spa light, so I upgraded the OEM pentair 18 watt LED to a 30 watt pixel module,. It is MUCH brighter. The WLED software does allow you to adjust the brightness of the LED as well though which is nice. If you have the 10" light, you can fit 2 of these, which would probably be about twice as bright for that model as well.
The cost of everything was under $100:
AliExpress WS2811 RGB Pixel Module $10 (you will need two of these for the 10" pool light)
QuinLED DIg Uno/Esp 32 w/ external antenna (Drzzs.com) - $45
12V Ac to DC rectifier (to Power Dig-Uno which powers the 12vdc pixel module) (Amazon) - $5
Aluminum sheeting (home depot) and nylon spacers (Amazon) for mounting pixel module and dig uno inside Light transformer - $15
Thermal compound for heat transfer (Amazon) - $7
New Pentair gasket- $20 (optional)
Re-used existing pentair housing
It required a bit of DIY skills for the electrical, fabricating the aluminum, hooking up and configuring the Dig-uno etc, but nothing crazy.
This pixel module is 2 pieces (see picture), the led portion is separate from the PCB Board. The way I mounted the control board was separately, I put a wrap of electrical tape around the pcb to keep it from grounding to the case and angled it underneath the pixel module and the aluminum sheet its mounted to. I expect that this will insulate the pcb from the direct heat better than the Pentair model, keep it cooler and help prevent it from cooking like the Pentair board.
To make this run from the WLED app instead of power off/on sequences like the Intellibrite, I repurposed the ground wire for the data communication. Since its zero volts DC you can however run the black wire to ground (from rectifier neg to ground) in the transformer. This is covered in the youtube video. Technically a ground wire is not required by NEC at the fixture, so I felt ok with this.
Overall, Im very happy with the results. I saved a ton of money over buying a new spa light, I have a much brighter light in the pool and this is far more flexible and customizable than the OEM was. I also expect this to last longer, but if it doesn't, it's only $10 to fix it next time and I bought a spare pixel module just in case.
Steps:
Installing the LED Module
1. Remove the old light and the LED driver board
2. Using the old board as a template, trace the size and the hole locations for the mounting screws onto a piece of aluminum sheeting
3. Cut 2 extra grooves on either side for the wiring to pass through. Smooth out the edges of the grooves so they dont cut the wires. I also used electrical tape to insulate them.
4. Mount the pixel module the board using the thermal paste on the back of the module and using 4 small screws to mount the module to the aluminum.
5. The Youtube video explains how to determine the correct wires to connect for + and - , the ground is repurposed for data.
6. Wrap the PCB around the edges with electrical tape and mount it diagonally at the bottom of the pentair fixture. I did not mount mine in any way as it really doesn't have any space to move around.
7. Install the pixel module and aluminum plate back into the Pentair. Don't close it back up yet until you've tested
Installing the WLED controller and electrical:
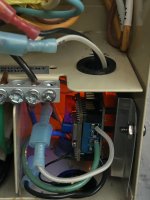
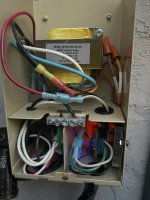
1. Follow the video link for how to wire the DC rectifier. The photos below show where I mounted mine in the 12 V transformer enclosure (top shelf). My transformer had 3 different voltage outputs, 12, 13 and 14. I used the 13v output to feed the rectifier due to the drop in voltage of 1v out from the rectifier.
I used the power outputs to the light/modules directly from the DigUno board since it already has capacitors built into it. This was plenty of power for the single pixel module and *should* be enough for two pixel modules for the 10" light but I didn't check and you will need to confirm. Otherwise you can take power directly from the rectifier but you will need to add capacitors to the pixel modules listed because they don't come with it.
2. I created a mounting board out of the left over aluminum sheeting, I formed into a raised platform for the DigUno/ESP32 board to sit on and allow mounting to the side of the transformer.
3. Setting up the DigUno and ESP32 is not difficult but has a number of steps. There is a lot of information posted on the Internet already about this so I'm going to share links rather than incorporate full instructions here. For wiring, see this: QuinLED-Dig-Uno Wiring Guide - quinled.info and to configure the ESP32: Pre-Assembled QuinLED-Dig WLED manual - quinled.info this will configure the ESP32 to your home wifi so you can connect to it later through the WLED application.
Note: Make sure to change the resistor switch on the DigUno, located in the middle of the pcb (it sits under the ESP32 board) to 33Ohms to make it work for the longer distances needed between transformer and light. THis is necessary for anything over 25 ft.
3. I used the spacers noted above the raise the board off the mounting sheet
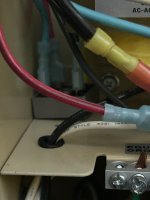
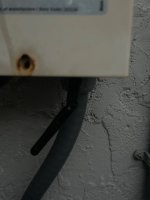
4. I used one of the punch outs in the bottom of the transformer to mount the wifi antenna for the DigUno / ESP32
5. Mount the DigUno into the transformer. I used the side wall of the transformer (see photos)
6.Install WLED to your smartphone and configure
7. Perform a quick functionality test of the LED pixel module before putting back into pool. Note: The pixel module/enclosure is designed to be cooled by the water, do not test the module outside of the pool with the lens/gasket installed.
8. After testing reinstall the gasket, cover, retainer for the light and reinstall back in the niche.
Completed Project Video. I created a nice custom 4 color transition:
Pixel Module mounted in housing.

WS2811 Pixel Module:

Dig Uno/ESP32 on transformer mounting plate:

Rectifier mounted in transformer

DigUno Mounted in transformer

All transformer mouting and wiring complete:

Antenna mounted in transformer:

WLED Application:

My Intellibrite 5g spa light (being used as a pool light for my smaller pool) died a while back. I built my own with some help from the Internet and some off the shelf 30 watt WS2811 Pixel modules from AliExpress. Following the recommendations of that youtube link, I swapped in a Quin-LED Dig Uno/ESP 32 controller which uses WLED software (free). I can now get millions of different colors and dozens of different lighting effects, plus its programmable, so you can design your own light shows and there are various modifications for the Dig-uno/esp 32 board, like microphones you can attach to have it change color to music, etc.
My pool is smaller and uses a spa light instead of the 10" pool light, but if you essentially double the recipe below and install two pixel modules, it *should" work exactly the same for the pool light, although I haven't tried it yet. That said, I've always been a little frustrated with the lighting level from the spa light, so I upgraded the OEM pentair 18 watt LED to a 30 watt pixel module,. It is MUCH brighter. The WLED software does allow you to adjust the brightness of the LED as well though which is nice. If you have the 10" light, you can fit 2 of these, which would probably be about twice as bright for that model as well.
The cost of everything was under $100:
AliExpress WS2811 RGB Pixel Module $10 (you will need two of these for the 10" pool light)
QuinLED DIg Uno/Esp 32 w/ external antenna (Drzzs.com) - $45
12V Ac to DC rectifier (to Power Dig-Uno which powers the 12vdc pixel module) (Amazon) - $5
Aluminum sheeting (home depot) and nylon spacers (Amazon) for mounting pixel module and dig uno inside Light transformer - $15
Thermal compound for heat transfer (Amazon) - $7
New Pentair gasket- $20 (optional)
Re-used existing pentair housing
It required a bit of DIY skills for the electrical, fabricating the aluminum, hooking up and configuring the Dig-uno etc, but nothing crazy.
This pixel module is 2 pieces (see picture), the led portion is separate from the PCB Board. The way I mounted the control board was separately, I put a wrap of electrical tape around the pcb to keep it from grounding to the case and angled it underneath the pixel module and the aluminum sheet its mounted to. I expect that this will insulate the pcb from the direct heat better than the Pentair model, keep it cooler and help prevent it from cooking like the Pentair board.
To make this run from the WLED app instead of power off/on sequences like the Intellibrite, I repurposed the ground wire for the data communication. Since its zero volts DC you can however run the black wire to ground (from rectifier neg to ground) in the transformer. This is covered in the youtube video. Technically a ground wire is not required by NEC at the fixture, so I felt ok with this.
Overall, Im very happy with the results. I saved a ton of money over buying a new spa light, I have a much brighter light in the pool and this is far more flexible and customizable than the OEM was. I also expect this to last longer, but if it doesn't, it's only $10 to fix it next time and I bought a spare pixel module just in case.
Steps:
Installing the LED Module
1. Remove the old light and the LED driver board
2. Using the old board as a template, trace the size and the hole locations for the mounting screws onto a piece of aluminum sheeting
3. Cut 2 extra grooves on either side for the wiring to pass through. Smooth out the edges of the grooves so they dont cut the wires. I also used electrical tape to insulate them.
4. Mount the pixel module the board using the thermal paste on the back of the module and using 4 small screws to mount the module to the aluminum.
5. The Youtube video explains how to determine the correct wires to connect for + and - , the ground is repurposed for data.
6. Wrap the PCB around the edges with electrical tape and mount it diagonally at the bottom of the pentair fixture. I did not mount mine in any way as it really doesn't have any space to move around.
7. Install the pixel module and aluminum plate back into the Pentair. Don't close it back up yet until you've tested
Installing the WLED controller and electrical:
1. Follow the video link for how to wire the DC rectifier. The photos below show where I mounted mine in the 12 V transformer enclosure (top shelf). My transformer had 3 different voltage outputs, 12, 13 and 14. I used the 13v output to feed the rectifier due to the drop in voltage of 1v out from the rectifier.
I used the power outputs to the light/modules directly from the DigUno board since it already has capacitors built into it. This was plenty of power for the single pixel module and *should* be enough for two pixel modules for the 10" light but I didn't check and you will need to confirm. Otherwise you can take power directly from the rectifier but you will need to add capacitors to the pixel modules listed because they don't come with it.
2. I created a mounting board out of the left over aluminum sheeting, I formed into a raised platform for the DigUno/ESP32 board to sit on and allow mounting to the side of the transformer.
3. Setting up the DigUno and ESP32 is not difficult but has a number of steps. There is a lot of information posted on the Internet already about this so I'm going to share links rather than incorporate full instructions here. For wiring, see this: QuinLED-Dig-Uno Wiring Guide - quinled.info and to configure the ESP32: Pre-Assembled QuinLED-Dig WLED manual - quinled.info this will configure the ESP32 to your home wifi so you can connect to it later through the WLED application.
Note: Make sure to change the resistor switch on the DigUno, located in the middle of the pcb (it sits under the ESP32 board) to 33Ohms to make it work for the longer distances needed between transformer and light. THis is necessary for anything over 25 ft.
3. I used the spacers noted above the raise the board off the mounting sheet
4. I used one of the punch outs in the bottom of the transformer to mount the wifi antenna for the DigUno / ESP32
5. Mount the DigUno into the transformer. I used the side wall of the transformer (see photos)
6.Install WLED to your smartphone and configure
7. Perform a quick functionality test of the LED pixel module before putting back into pool. Note: The pixel module/enclosure is designed to be cooled by the water, do not test the module outside of the pool with the lens/gasket installed.
8. After testing reinstall the gasket, cover, retainer for the light and reinstall back in the niche.
Completed Project Video. I created a nice custom 4 color transition:
Pixel Module mounted in housing.
WS2811 Pixel Module:
Dig Uno/ESP32 on transformer mounting plate:
Rectifier mounted in transformer

DigUno Mounted in transformer

All transformer mouting and wiring complete:

Antenna mounted in transformer:

WLED Application:
Last edited:

