Enabling the Jandy Aqualink RS-485 Protocol on the Vgreen 165 motor
In a couple of other posts
here and
above I have talked about how the Vgreen 165 motor can be enabled to talk Jandy's RS-485 protocol. This allows the motor to be controlled via the RS-485 connection by Jandy Automation systems such as the Aqualink RS or Aqualink PDA.
I want to summarize the steps to reconfigure the motor in one post with all the needed information.
First I want to thank
@zafarpatel7 who first posted the Regal (Century) document that describes the motor's native protocol. For reference here is a link to the
Gen3 EPC ModBus Comm Protocol PDF document. Without that document this configuration change wouldn't have been possible.
Reading that document I came across an interesting looking Configuration Parameter that is shown in this screen capture
View attachment 359685
Configuration page 10, address 0x05 is labeled Protocol selected and it's possible values 0-4 seem to indicate that one can select any of the "big three" protocols or select an all in one choice. Seeing this led me to see what it would take to try and change this value. I'll describe the details of the programming below, but it turns out that only choices 0 - default, and 1 - Jandy are the only valid choices that the programming will accept. If you try and enter 2 through 4 the motor just ignores the commands.
Hardware Needed
To talk to the RS-485 bus you need some hardware to convert the RS-485 physical layer to something that can talk to a computer. I bought a $15 dollar
USB to RS-485 adapter from Amazon. You also need a computer (laptop preferably) that can run a serial terminal program to send commands to the motor. If you are using a Windows based machine you can download this
Terminal BPP program. This is the program that I used and I'll describe how to use the Macro functions to send the needed commands to the motor.
To connect the RS-485 adapter to the motor you need a two wire cable (phone cord is fine) and then you connect the A and B terminals on the motor to the A and B terminals on the adapter. Here are a couple of photos showing those connections. You only need to hook up the A and B connections on the motor. The picture shows other wires connected on my motor as I also have the digital inputs hooked up, those are not necessary for re-configuring the motor. CAUTION: Before starting make sure you press Stop on the control panel to stop the motor. Then make sure the motor is powered off at the AC breaker for at least a minute before opening the wiring compartment!
View attachment 359686
View attachment 359687
After hooking up the two wires set the red DIP switches in the motor compartment as follows: Switch 1 through 4 - off, Switch 5 - on. Here's some more info on the switch settings from a Jandy pump manual that uses this same motor.
View attachment 359703
After you connect up the RS-485 adapter you need to run the terminal program. When you plug the adapter's USB port into the computer Windows should automatically install the driver for it, this may take a few minutes. After the driver installs the adapter should show up as a USB serial port in the Windows "Device Manager" screen in the Control Panel. Note the COM port number assigned to the USB adapter.
The terminal program is a simple one file executable so you can place it anywhere and click on it to run it. Once it runs you will see a screen that looks like this:
View attachment 359694
The terminal window is on the left and by clicking the "Set Macros" button on the lower left the Macro screen on the right will open up. At this point you will have blank macros. I have attached a file containing the macro's shown named "regal_macro.tmf.txt" to this post. This is just a text file despite the funny file extension. In order to attach this file I had to add the .txt extension to the file. The terminal program will look for macro files with the .tmf extension so you will want to rename this file and remove the .txt from the end when you copy this file to the directory where your terminal program is. If you copy this file to the same location as the terminal program you can click the "Load" button on the Macro listing, select the filename and then your macro screen should look like the one above.
Edit 6/24/22: In the receive box window you will see a few check boxes that select the format that the terminal program displays. By default the Ascii box is checked, you need to check the leftmost hex box as shown on the screen capture above so that the data is displayed in hex format. If the default Ascii format is checked the motor response will be gibberish and may not display at all.
To connect the Terminal program to the RS-485 adapter select the correct COM port number (in the top left) and then click the Connect button.
Now you can turn the AC power back on to the motor. The motor should be stopped, if it isn't press "Stop" on the control panel.
Before going further I should explain what all the funny characters in each Macro mean. These are all the digital commands to control the motor over the RS-485 interface. If you want to delve into the nitty gritty you can read the Modbus Protocol document. All the Macros that start with $15 ... are native Modbus commands. The Macros that start with $10$02 are commands in the Jandy Protocol format.
Here's what each Macro does:
M1 - Read the motor status
M2 - Read the value of the configuration variable on page 10, address 0x05
M3- Write the value of 1 to the configuration variable on page 10, address 0x05
M4 - Save the configuration values to Flash Memory (This makes the change persistent through power cycling)
M5 - Set the motor speed (aka Demand) to run at 2500 RPM in Jandy Protocol.
M6 - Send the "go" command to start the motor in the Jandy Protocol.
If the motor is powered up (doesn't need to be running), and you have selected the right COM port and are connected you should be able to click the M1 macro key and the motor should reply with the response 15 43 10 20 F9 E4 . The fourth value may be different depending on what state the motor is in. The key thing here is that you get some response. If you get a response you are good and you're connected, the COM port is right, and you have the RS-485 wiring between the motor and the adapter correct. If you don't get a response you aren't talking to the motor and you need to recheck the configuration of the terminal port and the wiring. By the way all the default speed settings of the terminal program are correct for talking to the motor as the RS-485 bus runs at 9600 Baud. You don't have to change any of those settings.
If you received a response from the motor you are ready for the next steps.
- Next click on M2 and the motor should respond with 15 64 10 0A 05 00 00 85 FF. The 7th value in the list is 00 indicating that the configuration variable is at it's default of 0.
- Then click M3 to reprogram that variable to 1, the motor should respond with 15 64 10 8A 05 00 01 6D FF. Note that the 7th value is now 01 as the motor acknowledged a value of 01 was written.
- Next click M4 to save the configuration to flash. The motor should respond with 15 65 10 4A 98.
- Now turn off the AC power to the motor for 30 seconds and then turn it back on. No need to press start
- After the motor is powered back on click on M5. This sends the motor a speed command (aka demand) in the Jandy protocol. If Dip switch 5 is on the motor should reply to the Jandy command with 10 02 00 1F 44 00 10 27 00 AC 10 03 .
- Then click M6 to issue the go command to the motor. It should return 10 02 00 01 41 00 54 10 03 and the motor should start running for a minute. (The motor will stop after 1 minute because the RS-485 interface times out if it doesn't receive a command at least once a minute. You can click M6 again and the motor will run for another minute.) The real Jandy system is constantly talking (polling) the motor so this timeout doesn't ever happen when connected to a real system.
Commands M5 and M6 are commands in the Jandy protocol and you have just confirmed the Jandy protocol is now working.
Switch 5 in the motor's wiring compartment now controls which protocol the motor talks. When SW5 is on it talks Jandy only. When SW5 is off it talks the Modbus protocol only. With Switches 3 and 4 off the pump responses to the pump1 address (0x78). See the switch table from earlier in the post that describes the addresses.
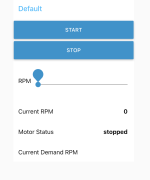
That's it, you are done. Now connect up the four terminals of the motor's RS-485 connector to your Aqualink RS-485 connector and then go into the Aqualink configuration web interface and select the VSP pump setup and select a Jandy EPump1 for the filter pump. Follow the Jandy instructions for configuring all your wanted speeds. After configuring you should see something like
this on the Aqualink status screen.
After hooking everything up the process only takes a couple of minutes to do the programming changes. It takes a lot longer to explain it all
")
I'm sure I probably left something out, feel free to ask if you have any questions,
-Mark


