Ball valve replacement question

Gourockian

Well-known member
Jun 23, 2024
45
Tampa Bay area, FL
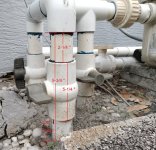
After doing some pressure testing yesterday, I discovered that at least two of the three ball valves shown in the attached picture need to be replaced. I had injected water at the union joint with the spa valve open and drain plugged. The one for the spa dripped water at the valve stem but did not seem to be the main cause of the fairly large pressure drop. When I injected air to try and trace an additional leak, I discovered bubbles emerging from the skimmer while it's valve was supposed to be 'fully' closed. I intend to replace all three with true union full flow valves so that any future maintenance or replacement will be straightforward.

My plan is to cut the 1-1/2" pipes immediately above the valve bodies which will allow them to be lifted clear, by disconnecting the union feeding the pump. Then I propose trying to remove the valves by heating the lower section with a hot air gun and twisting them off. The reason for this approach is that there are only 9-3/4 inches between ground level and the bottom of the 3-way assembly and the new valves are approximately 3/4 inch longer than the existing ones. I'm hoping that I won't need to cut any more of the existing pipes in order to fit the new valves but if necessary, it will be easier to trim them from the upper section while it is removed.

After removing the valves, I'll be able to pressure test the spa drain and skimmer lines independently as I've suspected both to have air leaks for some time. Fortunately, the main drain has not given any problems so far. 🤞

Has anyone attempted to remove valves this way (heating) and if so, do you have any tips or advice to offer?

Thanks,

Al
Pool Valves.jpg
 
The article below covers some strategies, including heat:


@HermanTX has some personal experience with the heat method.

Hopefully you'll be replacing the hardware store ball valves with Jandy 2-ways.

If needed, you should be able to remove the concrete remnants and dig deeper for more room.
 
The article below covers some strategies, including heat:


@HermanTX has some personal experience with the heat method.

Hopefully you'll be replacing the hardware store ball valves with Jandy 2-ways.

If needed, you should be able to remove the concrete remnants and dig deeper for more room.
Hi Mike, thanks for your quick response and the link to the PVC Repair article - some very good info there.

I did initally plan on using Jandy 2-ways but they don't seem to have true union valves available so I've ordered these from Amazon. https://www.amazon.com/dp/B0BX7ZNFYK?ref=ppx_yo2ov_dt_b_product_details&th=1. These will allow me to glue up and twist on the six ends individually then insert the bodies whereas with the Jandy's (or other single body valves), I would only be able to twist on one end of each valve then try to assemble the three remaining ends all at once, without any way of twisting them.

Yes, I could easily dig down to expose more pipe if need be - it's just dirt and pebbles where they enter. The concrete you see in the picture is just leftovers from a previous project and was dumped there. One of these days I hope to redo that whole corner.

Regards,

Al
 
My plan is to cut the 1-1/2" pipes immediately above the valve bodies which will allow them to be lifted clear, by disconnecting the union feeding the pump.
On second thoughts, it might be better to cut through the top part of the valves, about an inch down, then heat up to remove the remainder after lifting off the top assembly. This would give more pipe to work with, should it be required. I was planning on using an angle grinder to reduce debris falling into the pipework but if the valves are closed, this shouldn't be a concern.
 
Well, I cut through the valve bodies, retaining the three-way suction array but when I tried to heat up the bottom part with the heat gun, the pipe became too soft and was starting to twist. I think this was because the wall of the valve body was about twice the thickness of the schedule 40 pipe so required more heat than a normal fitting. So, I ended up cutting the pipes immediately below the valves but then found that the pipes only went down about 2" below ground level then made a 90-degree turn towards the pool. This had me worried for a few minutes, thinking that I would be short of pipe but after some careful measuring and calculating, I realized that as the new valves were larger, things were not so bad after all.

After cutting off the upper parts of the valve bodies, the new valves would be about 1.5" lower than the 3-way input into the pump but as it sat on two 1.5" thick slabs, the obvious solution was to remove one of them and adjust the output to the filter. The new valves are chunkier than the old ones so, before fitting the third one (at the top of picture 1), I had to modify the spa return line as it was too close to allow the lower locking ring to be positioned. The second and third pictures show them in place.

Before fitting the valves, I pressure tested the spa drain line with my home-made rig and found that it held pressure perfectly. The skimmer line didn't hold pressure but I used Marlig Fix-A-Leak, following their instructions for suction line leaks and left it to cure for more than 72 hours. After turning on the system and opening the skimmer valve, the air bubbles disappeared within about 30 seconds and so far so good. Time will tell if it's a permanent fix but I'm happy that I don't need to dig up the concrete deck, at least for now. As well as the 32-oz bottle of Fix-A-Leak, I ordered a submersible pump to set up the closed loop so, for a total of $76, I think it was money well spent.
 

Attachments

  • Picture 1.jpg
    Picture 1.jpg
    663 KB · Views: 7
  • Picture 2.jpg
    Picture 2.jpg
    588.3 KB · Views: 7
  • Picture 3.jpg
    Picture 3.jpg
    538.7 KB · Views: 7
  • Like
Reactions: Rancho Cost-a-Lotta
Thread Status
Hello , This thread has been inactive for over 60 days. New postings here are unlikely to be seen or responded to by other members. For better visibility, consider Starting A New Thread.