Any way to repair leaking gate valve without removal?

CPM10V

Well-known member
Jun 12, 2019
60
Phoenix, AZ
Pool Size
25000
Surface
Plaster
Chlorine
Liquid Chlorine
Is there any way to stop (at least temporarily) a small leak from an old gate valve without dismantling the valve/piping assembly?

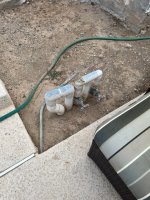
Recently I've noticed both of these gate valves leaking at the interface between valve and piping (as best I can see). I believe one controls return flow and the other controls flow to an old "whip" cleaning system. I've never opened/closed them since I bought house about 5 years ago. They seem to be locked into position from misuse from previous owner. Pool works fine with where the valves are at. The plumbing & valve layout from skimmer to pump is goofy and needs to be re-done but I'm not ready to do that and replace the pump/filter for a few more months. Thought I may get by with something for leak at least temporarily. Thanks.
 

Attachments

  • IMG_5264.jpg
    IMG_5264.jpg
    671.4 KB · Views: 22
  • IMG_5263.jpg
    IMG_5263.jpg
    741.8 KB · Views: 21
Are the gate valves above or below the height of the pool water level?

It would be best to remove the metal gate valves. Either replace with 2-way Jandy valves or eliminate them completely if they don't serve a viable purpose.
 
Are the gate valves above or below the height of the pool water level?

It would be best to remove the metal gate valves. Either replace with 2-way Jandy valves or eliminate them completely if they don't serve a viable purpose.
They're both above pool water level. If replacing with another valve, would you need to lower the water level so that it's below the valves, or is there a different method used to do that? If I eliminated them entirely, would a simple sleeve then take the place of the valve?
 
They're both above pool water level. If replacing with another valve, would you need to lower the water level so that it's below the valves, or is there a different method used to do that? If I eliminated them entirely, would a simple sleeve then take the place of the valve?
No need to lower the pool water level. You may need to drain the equipment pad down though - but that is usually done by opening the air bleed on the filter to allow the filter and plumbing to drain. There isn't all that much water in the above ground plumbing.

If you were to eliminate the two valves, you would replumb with PVC pipe and couplers or other fittings.
It looks like the plumbing has been repaired a few times over the years. You can always choose to clean that up by eliminating a good number of the couplers visible in your pics. Show us a wider view of all the plumbing and equipment from a few different angles - maybe someone can provide a few options for replumbing.

It would also be a good idea to paint the PVC plumbing to protect it from the PHX sun.
Thanks for the info. Here's an overall view of the area we're discussing.

I believe the right-hand pipe cluster w/ valves is for 1) main returns and 2) mini wall returns that are supposedly for powering a whip cleaner.
The left-hand piping I believe goes from skimmer to pump. I'm not sure why it is jogged over & above ground like that other than to avoid some sort of obstacle when someone was re-doing things? Seems like someone was cheaping out.
The overall layout and design of the pool equipment seems sloppy. Sometime next year the plan is to replace everything from the skimmer back so this will be around not much longer.

What do you recommend for painting the exposed PVC?
 

Attachments

  • IMG_4302.jpg
    IMG_4302.jpg
    91 KB · Views: 11
The jog is probably from a previous repair, plumbing redo or poor planning in the initial planning.

Do the "mini wall returns" have water coming out when the pump is running?

Much of your plumbing is already sunburned. At a minimum, it will need a light sanding (or just replace all above ground plumbing) and a couple coats of spray paint (Krylon or other paint in a spray can) or a good coat of exterior house paint that you brush/roll on.

If those valves aren't badly leaking, you could just wait until spring when you replace the pump, and j
replumb it all then.

Yes, the mini returns have a flow, albeit about half that of the primary returns. A few people who have seen the pool said they're for an old style of pool cleaner (a rubber "whip") but can function as a slow return if no accessory attached.

Are "best practices" to paint all piping and fittings prior to installation?
Paint after installation. Use flat-black paint, not glossy. Inexpensive Home Depot spray works well.
 
  • Like
Reactions: CPM10V and proavia

Enjoying this content?

Support TFP with a donation.

Give Support
Paint after installation.
Use a beige or tan color. I'm not a fan of the flat black.
I've used both glossy and matte - in either case, it tends to dull with time and sun exposure.
The color below is a little light for my taste, but my wife picked it, so......

1703821583116.png
 
  • Like
Reactions: CPM10V
Thread Status
Hello , This thread has been inactive for over 60 days. New postings here are unlikely to be seen or responded to by other members. For better visibility, consider Starting A New Thread.