- May 25, 2022
- 12
- Pool Size
- 15500
- Surface
- Fiberglass
- Chlorine
- Salt Water Generator
- SWG Type
- Hayward Aqua Rite (T-15)
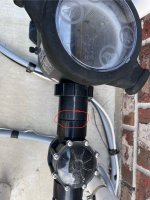
Hi All, this past weekend I needed to clean my cartridge filter. When I turned off my pump and released pressure from the filter, I noticed water drops slowly coming from the underside of the black pipe between pump and check valve that I circled in red. I’ve also noticed that my pump basket remains about half full of water at low speeds but stays full of water at high speeds. I assume I have a suction side leak at the red circled area in the picture. I did not install check valve so I’m not sure how it is connected to pump and don’t want to mess anything up. Other than calling pool builder is this an easy fix I may be able to do myself?